Turkey Roasting

Turkey Roasting

Turkey Weight and Roasting Times

8 – 12 lb. 
Unstuffed – 2 3/4 to 3 hr.        
Stuffed – 3 to 3 /1/2

12 – 14 lb.
Unstuffed – 3 to 3 3/4 hr.      
Stuffed – 3 1/2 to 4

14 – 18 lb.
Unstuffed – 3 3/4 to 4 1/4 hr.
Stuffed – 4 to 4 1/4

18 – 20 lb.
Unstuffed – 4 1/4 to 4 1/2 hr. 
Stuffed – 4 1/4 to 4 3/4

20 – 24 lb.
Unstuffed – 4 1/2 to 5 hr.        
Stuffed – 4 3/4 to 5 1/4

How To Tell If Steak Is Done

There are two basic methods to test for how done your meat is while you are cooking it.

  • Use a meat thermometer.
  • Press on the meat with your finger tips.

    The problem with the meat thermometer is that when you poke a hole into the meat with a thermometer, it can let juices escape that you would rather have stay in the meat. For this reason, most experienced cooks rely on a “finger test” method,

    Test for steak doneness by pressing a finger into the meat.

    Rare feels like your chin
    Medium like the tip of your nose
    Well done feels like your forehead

    Tip – Let steaks sit for 10 minutes after they come off the grill so the juices have time to redistribute

    Tip – Meat should be blotted dry with paper towels before it meets the heat. If not it’s boiling, steaming and braising – not grilling.

  • Reference – Meat & Seafood Internal Temperature Cooking Chart

    Grilled Hamburgers

    Grilled Hamburgers

    hamburger.jpg

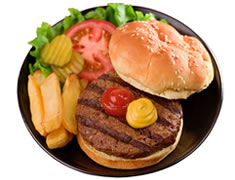
    Typically people think of a hamburger patty as beef. When using ground beef to make hamburger patties you want to select the right meat. Getting expensive and lean cuts for grinding won’t make a better burger. The real secret to the burger flavor is in the fat, ground chuck, round or sirloin work best or a combination also works. The other factor that improves the patty is a coarse grind. finely ground meat can become soft and mushy, making the patties hard to work with and more likely to fall apart on the grill.

    Lean ground beef like ground sirloin or the 7 – 10% fat meat will tend to make dry burgers. Remember, when you grill a burger a lot of the fat will drain off so starting out too lean can make for a dry burger. But too much fat and the burger will shrink while cooking. I use 80/20% which seems to work very well.

    When it comes to forming the patties, make the burger slightly larger than the bun and about an inch in thickness. A thicker patty will not allow you to get the middle cooked safely before the surface becomes too dry, also don’t pack the meat too firmly. Finely chop any vegetables you may put in the patty to avoid making the patty unstable while cooking.

    Start with a very hot grill, lift the lid and place the patties on the grill. When the raw meat hits the hot cooking grate it will stick, if you try to turn it too early the burger will fall apart. The process is that as the bottom of the patty cooks the grease will create a non-stick surface on the patty and the heat from the grate will char the meat, separating it from the grate. At this point you want to flip the patties, the process will repeat. When the burgers have released again, flip them again and turn down the heat continue grilling for about 2-3 minutes, flip a third time and continue for about 2-3 more minutes, during the last minute would also be the best time to add any cheese or your favorite sauce before removing the burger.  Remove the hamburger patty when done and let sit for 1 -2 minutes before you serve.

    Try using fresh ground beef in your next hamburger. Most any butcher will grind meat on demand, so pick up some fresh ground round or chuck, not too lean, take it home and grill it right away. You will definitely notice a difference, use freshly baked rolls to finish off the perfect sandwich.

    Try adding a toppings bar for people to choose their own toppings to create their own perfect hamburger.

    Tip – I personally prefer to add Worcestershire’s sauce  and Ted’s all purpose seasoning before cooking, and also on the first flip.

    Grilling Hints & Tips

    grill.jpg

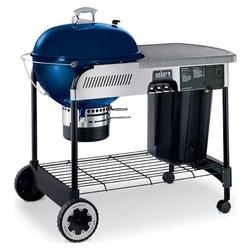
    If you haven’t grilled before, these hints and tips will help you grill safely with the best, juiciest, most savory results. Whether you use charcoal, propane, or natural gas grills, there are steps to take before you start cooking. 

    Grills should be well away from buildings, brush and overhanging trees. Never grill inside your home, or in an open garage. Follow manufacturer’s instructions for lighting gas and charcoal grills.  A charcoal fire takes 30-45 minutes to reach the proper cooking heat after you light it. You can tell when the coals are at proper cooking temperature because gray ash will form evenly over the briquettes.

    Charcoal Grills

    Charcoal grilling presents  a learning challenge.

    Here are some tips.

    The number of briquettes you use depends on the size of your grill, the amount of food you will be cooking, weather conditions and cooking time. As a general rule, plan on using about 30 briquettes to cook 1 pound of meat. A five-pound bag contains 75 to 100 briquettes. Have enough briquettes to cover the grill pan in a single layer, stack them for lighting or remove to place in a chimney starter. 

    To light charcoal with the pyramid method, stack the charcoal into a pyramid shape. Soak the charcoal with at least 1/2 cup of lighter fluid (NEVER use gasoline). Wait a few minutes then light the charcoal with a long handled match or fire starter. As the coals begin to burn and ash forms, arrange them with long handled tons into a single layer. Don’t squirt lighter fluid onto hot coals, the fluid can catch on fire and burn back at you.

    Chimney starters they look like a coffee can with a handle, It lets you get a really good fire going with no chemicals. Place crumpled newspapers in the bottom portion of the starter. Remove the rack from the grill and place the chimney starter in the bottom. Fill the top half of the starter with charcoal. Then light the newsletter through holes in the bottom of the starter. The fire will draw up through the starter, lighting the charcoal. Leave the chimney starter where it is, and in about 20-30 minutes the coals will be ready. With a heavy long oven mitt, carefully empty the coals into the grill pan. Arrange the coals into an even layer with long tongs.

    Electric starters are easy to use. They are plug-in heating elements that also start the fire with no chemicals. Place the electric starter in the grill pan and stack the charcoal briquettes over it in a pyramid shape. Plug in the starter, making sure you are using a heavy-duty extension cord. Ash will begin to form on the coals after 8-10 minutes. Then unplug the starter, remove it with tongs, then arrange the briquettes with tongs into an even layer.

    Propane And Gas Grills

    Gas grills use lava rocks, the rocks are heated by the gas flame and cook like charcoal. Keeping the rocks clean is about the only task you’ll have with a gas grill. If there is a buildup of grease on the rocks you will have flare-ups during cooking which can burn the food. Turn the burner to high for five minutes after you’re finished cooking to help burn off grease and other drippings. Occasionally rearrange and turn the lava rock, replace the lava rocks when they don’t look clean, and start to break apart. Do not stack lava rocks. They should be only one layer deep on the grate.

    Cooking Methods Indirect And Direct

    Grilling uses two different cooking methods: indirect and direct heat. In direct heat cooking, food is placed on the cooking rack directly over hot coals. Indirect heat is used for more delicate foods and for longer cooking times used for larger cuts of meat, as when you’re barbecuing a turkey. The grill is always covered when cooking with indirect heat.

    For two-level charcoal grilling, or a hot side and a cooler side, arrange 3-4 layers of coals on one side of the grill; just 1 layer on the other. This method will let you control temperature as you cook. Sear foods on the hot side, move to the cooler side to cook through.

    For indirect cooking on a charcoal grill, place an equal number of briquettes on each side of the grill pan, leaving an empty space in the center. Light the briquettes. When you’re ready to cook, place a drip pan between the coals and add water to the pan to a level of 1/2″. Place the food over the drip pan and cover the grill. You will need to add 5-6 briquettes to each side of the pan as needed to maintain even heat, about every 45 minutes.

    For indirect cooking on a dual burner gas grill, set the drip pan on the lava rocks on one side of the grill and add water to 1/2″. Preheat the other burner on high for 5-10 minutes. Turn the temperature down to medium, then put the food on the rack over the drip pan and cover.

    For indirect cooking on a single burner gas grill, preheat the grill on high for 5-10 minutes. Turn the temperature down to low, place a foil baking pan on the rack. Place food in the pan, cover and cook.

    Grilling Tips And Safety

    Never leave the grill alone when you are cooking food. Flare ups can quickly become a fire, Once you start, stay there and pay attention!

    Adding wood chips and chunks can add marvelous flavor to your food. Soak mesquite, alder, hickory and pecan chips for one hour before scattering over the hot coals. Sauces containing sugar and fat will cause flareups and the food may burn, apply sauces and glazes during the last 10 minutes of cooking time.

    Grilling times are affected by the weather.

    To lower the cooking temperature, raise the cooking rack, close vents

    To raise the temperature, lower the cooking rack.

    If the weather is cold, Grilling will take longer.

    Wind will make the fire hotter.

    On a humid day, the coals will burn slower.

    Cold and thicker foods will take longer to cook.

    Hardwood fires will burn hotter than charcoal briquettes.

    The most reliable way to test when food is done is by using a thermometer.

    Move the food around on the grill for the most even cooking results.

    Piercing the food with a fork will release juices that you want in the food.

    Clean Up

    After you’re done grilling, close the grill cover and turn the gas grill off or close the vents on your charcoal grill. Keep an eye on the grill and the coals as everything is cooling down. Move the grill or remove the used briquettes only when everything is completely cool. keep an eye on kids and pets so they stay away from the grill until it is cool.

    Have a safe and fun time grilling this summer!

    Mike’s Steak Guide

    Steak Guide

    steak.jpg

    Grilling Steaks

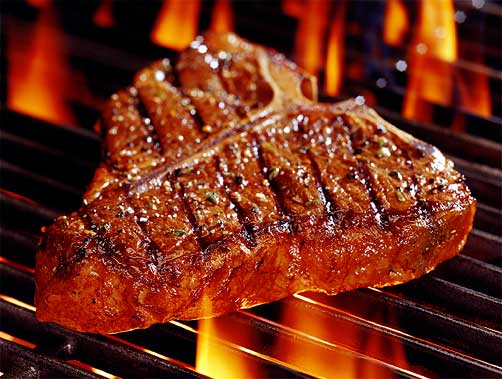
    Grilling Instructions – Start with a hot grill, wait that extra couple of minutes for the cooking surface to be really hot.  The first step of the process is cosmetic to give the steaks those nice grill stripes. Let the steaks sit and sizzle for about two to three minutes each side on High. When you have the look, cook on medium temperature until desired wellness.

    New York Steak

    Essentially a T-Bone steak with the bone removed, leaving a fabulous cut of meat full of flavor and ultimate tenderness. The New York is a great steak for those who like a lean but juicy steak.
    Grilling Steak – Dry, direct heat; grill, broil or pan-fry

    Ribeye Steak

    Cut from the juiciest, most flavorful part of the forequarter. Distinctly well marbled but trimmed of all non-essential fat, this cut delivers a tremendous flavor.
    Grilling Steak – Dry, direct heat; grill, broil or pan-fry

    T – Bone Steak
     
    New York and Tenderloin all in one steak plus a bone in the centre that helps to retain moisture while cooking.
    Grilling Steak – Dry, direct heat; grill, broil or pan-fry

    Porterhouse Steak

    Quite simply is a larger version of a T-Bone steak.  A combination of two of the best cuts, a tender Fillet and a juicy New York.
    Grilling Steak – Dry, direct heat; grill, broil or pan-fry

    Prime Rib Steak

    Cut from the rib section next to the shoulder these steaks are well marbled, tender, and on the bone to retain and enhance steak juices.
    Grilling Steak – Dry, direct heat; grill, broil or pan-fry

    Tenderloin Steak / Filet Mignon

    Usually the gourmet’s choice. No other steak is as highly prized for its “melt in your mouth” goodness while remaining one of the leanest cuts available. Properly prepared, it can actually be cut with a fork.
    Grilling Steak – Dry, direct heat; grill, broil or pan-fry

    Top Sirloin Steak

    Cut from the end portion of the loin and offers a robust flavor and tenderness quality all its own.
    Grilling Steak – Dry, direct heat; grill, broil or pan-fry

    Marinating Steaks

    Marinate Instructions – Combine marinade ingredients in small bowl; reserve 1/4 cup marinade for basting. Place remaining marinade in food-safe plastic bag, add steak.  Close bag securely and marinate in refrigerator 1 – 6 hours or as long as overnight, turning occasionally.

    Sirloin Tip Steak

    Very lean, marinating helps to enhance the tenderness of this cut. Excellent for brochettes.
    Marinating Steak – Dry, direct heat; grill, broil or pan-fry

    Flank Steak

    Also called London broil. It is a lean, flat, boneless cut from the flank section, just below the loin and sirloin. It is popular marinated or stuffed and rolled.
    Marinating Steak – Dry, direct heat; grill, broil or pan-fry

    Eye of Round Steak

    A versatile cut from the hip area. Although very lean, it is not short on flavor. Try having this cut a little thicker and cut across the grain to enhance tenderness.
    Marinating Steak – Dry, direct heat; grill, broil or pan-fry

    Round Steaks

    Cut from the inside thigh portion of the round. Top round steaks are not as tender as those from the loin or sirloin, but they have a good combination of tenderness and flavor.
    Marinating Steak – Dry, direct heat; grill, broil or pan-fry

    Simmering Steaks

    Blade / Chuck Shoulder Steak

    Full of flavor and texture. This cut can be bone in or boneless, cut thick or thin, and can be broiled or roasted.  The best way to cook chuck steaks is to braise them. To braise, sear them on both sides in a heavy pan, add a small amount of liquid such as seasoned broth or wine, cover tightly and simmer them until tender.
    Simmering Steak – Cook with Liquid, low heat and covered

    Sweet Corn

    Sweet Corn

    Grilled Corn In The Husks

    For intense flavor and perfectly tender kernels.  Prepare the ears pull back the husks and remove silks, replace the husks and tie in place with a strip of husk or string. Soak in water for 10 minutes.

    Outdoors – Grill turning often, until husks are charred and corn in hot 7 – 10 minutes

    Indoors – Broil turning occasionally until husks are charred and corn is hot 7 – 10 minutes

    Wrap Husked Ears In Foil

    For ultra moist corn that can e prepared ahead. Lightly brush corn before of after grilling with melted butter, oil or seasoned spread and wrap in aluminum foil.

    Outdoors – Grill turning often until heated through 7 – 10 minutes

    Indoors – Bake corn a 400 degrees

    Bronzed And Smoked

    Place oiled husked ears directly on the grill for better bronzing of the darnels and a deliciously smoky flavor

    Outdoors – Grill turning often until kernels start to turn golden brown 7 – 10 minutes

    Indoors – Cook corn on a stove top grill pan or broil 6 inches from heat source

    Cooking Terms

     Glossary Of Cooking Terms

    A La Mode – Dessert served with or garnished with a topping of ice cream

    Bake – To cook by dry heat in an oven

    Baste – To moisten foods during cooking with pan drippings or special sauce to add flavor and prevent drying

    Beat – To whip with a spoon, hand beater or electric mixer in order to combine food or incorporate air as in beat in egg whites and whipping cream

    Blanch – Placing food in cold water, bringing it to a boil for the time specified in the recipe, then draining well and refreshing in cold water to stop the cooking process. This technique is often used to loosen the skin of tomatoes for easier peeling or partially cooking fresh green beans or asparagus for use in a recipe.

    Blend – To mix ingredients until thoroughly combined

    Boil – To cook at boiling temperature which is 212 degrees at sea level

    Braising – A cooking method where the food (usually meat) is browned first, then slowly cooked in a liquid such as broth, water, or wine.

    Broil – To cook by broiler or over coals or any other method of direct heat

    Cream – To work or beat shortening until light and fluffy

    Cut In – To mix shortening with dry ingredients using pastry blender or knives

    Dredge – To coat with flour or finely ground ingredients

    Fold – To combine ingredients by blending with a spoon or wire whisk, using and up and over rotating motions

    Glaze – To coat with thin sugar syrup that has been cooked to the crack stage or to cover with a thin icing

    Grill – To cook food on a heavy metal grate that is set over hot coals or other source of heat.

    Julienne – To cut vegetables, meat, or poultry into thin, matchstick-size strips.

    Knead – To manipulate with a pressing motion plus folding and stretching

    Marinate – To allow food to stand in a liquid to tenderize or to add flavor

    Mince – To cut of finely chop food into very small pieces

    Poach – To cook in hot liquid, be careful that food holds its shape while cooking

    Pre Cook – To cook food partially or completely before final cooking or reheating

    Puree – To grind or mash food until it forms a smooth, thick mixture.

    Reconstitute – To return a dried form of food to its natural state, usually by adding water.

    Reduce – Through evaporation, to decrease the volume of liquid by boiling it rapidly in an uncovered pan to increase its flavor and thicken the consistency.

    Sauté – To brown or cook in a small amount of hot shortening

    Scald – To heat liquid to a temperature just below the boiling point

    Score – To cut shallow slits in the surface of a food before cooking to increase tenderness, to vent steam, or to serve as a decoration.

    Sear – To brown the surface of a food quickly with high heat.

    Shred – To cut food (such as cheese, carrots, or cabbage) into slivers or narrow strips, either by hand or using a hand-held grater or a food processor fitted with a shredding disk. Cooked meat, fish, or poultry can be shredded by pulling it apart using two forks.

    Shuck – To remove the husks and silks of an ear of corn or to remove the shell from shellfish such as oysters or clams.

    Simmer – To cook in liquid that is just below the boiling point

    Steam – To cook in steam with or without pressure, a small amount of boiling water is used, more water being added during steaming process necessary

    Stir-fry – To quickly cook small pieces of food over very high heat while constantly and briskly stirring the food until the food is crisply tender. A wok or large skillet is usually used with this Asian cooking technique.

    Truss – To secure fowl or other meat with skewers to hold its shape during cooking

    Whip – To beat rapidly to incorporate air and produce expansion, as in heavy cream or egg whites

    Whisk – To beat or whip ingredients with a kitchen utensil that consists of a series of looped wires that form a three-dimensional teardrop shape.

    For Perfect Cookies

    For Perfect Cookies

    Cookie dough that is to be rolled is much easier to handle after it has been in a cold place 10 to 30 minutes.

     This keeps the dough from sticking, even thought it may be soft. If not done, the soft dough may require more flour and too much flour makes cookies hard and brittle. In rolling, take out on a floured board, only as much dough as can be managed easily. Flour the rolling pin slightly and roll lightly to desired thickness. Cut shapes close together and keep all trimmings for the last. Place pans or sheets in upper third of oven. Watch cookies carefully while baking to avoid burning edges. When sprinkling sugar on cookies, try putting it into a salt shaker, It saves time.

    Thawing Times For A Turkey

    Thawing Times For A Turkey

    Turkey Size (lbs.) Refrigerator (Days) Cold Water (Hours)
    8-12                                   1-2                        4-6
    12-16                                 2-3                        6-8
    16-20                                 3-4                        8-10
    20-24                                 4-5                        10-12

    Placing a frozen turkey in the refrigerator is the only reliable and safe method for thawing and it is the only method that is recommended. The turkey should be kept in its original wrapper during the thawing process and it should be placed on a platter to catch any juices that may leak from the package.

    Thawing a frozen turkey in cold water is another defrosting method that has been used for years, but with increased awareness of illness due to bacterial growth, it is generally NOT recommended.

    Some people have used a microwave oven for thawing meat, it is downright unsafe for thawing poultry.

    Note:
    If the original wrapper has any punctures or tears in it, the turkey should be placed in another plastic bag and sealed. The turkey should be placed breast side down and it should be completely covered with water. The water must be changed every 30 minutes.

    Cold water thawing is much faster than thawing in the refrigerator 10 times faster, but it can be annoying having to change the water every 30 minutes, especially when thawing a large turkey.