
Why You’ll Love This Salty Canadian Iced Latte
You saw it on TikTok. You saved it. Now actually make it.
I’m talking about the salty Canadian iced latte, the drink that’s been taking over coffee feeds all summer. Maple syrup, butter, salt, and espresso whipped into a foamy cloud, then poured over cold milk and ice. It sounds like a prank, honestly. Salt in coffee? Butter in a latte? But the first sip converts you. It tastes like a pancake breakfast in a glass, if that pancake breakfast also came with a gentle caffeine buzz.
Here’s the thing. I was a skeptic too. I watched the video, saved the recipe, then scrolled past it for two weeks. But then I did the math on my coffee budget and realized I was spending nearly seven bucks a day on iced lattes. Seven dollars a day. For something I could genuinely make at home in five minutes.
Now, months later, this salted maple iced latte is my signature drink. I make it for friends. I make it for weekend brunch. I make it when the 3 PM slump hits and the thought of hot coffee makes me want to cry. It’s become the viral coffee recipe I actually return to, which is saying something.
What Is a Salty Canadian Iced Latte, Anyway?
The salty Canadian iced latte is exactly what it sounds like: an iced latte with maple syrup, a little butter, and a pinch of salt blended into the espresso until it turns into a thick, velvety foam. The foam sits on top of the cold milk like a maple blanket, and every sip is sweet, salty, creamy, and bright.
It went viral for a reason. The butter is the secret. When you froth hot espresso with butter and real maple syrup, something magical happens. You get this dense, almost mousse-like foam that doesn’t fall apart. It floats on the milk, holding its shape while you sip, and every mouthful tastes like the best part of a diner breakfast. This is the TikTok coffee trend that actually earned the hype.
The salt matters more than you’d think too. A tiny pinch sharpens the maple sweetness, the same way salted caramel beats regular caramel every time. It makes the flavor linger on your tongue. Skip it and the drink tastes flat. Trust me on this one.
Ingredients for a Salty Canadian Iced Latte
You’ll need six things, and you probably have most of them in your kitchen already. This homemade iced coffee is all about letting a few good ingredients do the heavy lifting.
- Freshly pulled espresso: 2 fl oz (60 ml) gives the drink its backbone. No espresso machine? Instant espresso powder mixed with hot water works surprisingly well. Regular coffee is too weak, so don’t bother.
- Real Canadian maple syrup: 1 1/2 teaspoons. Please use the real stuff. Pancake syrup is mostly corn syrup and artificial maple flavor, and it won’t give you that deep, rounded sweetness. Look for Grade A Dark maple syrup if you can find it.
- Unsalted butter: 1 1/2 teaspoons, softened if you have time. Unsalted matters. You want to control the salt level yourself rather than guessing what’s already in the butter.
- Fine sea salt: One pinch. That’s it. It dissolves right into the espresso and does its quiet work. Flaky sea salt works too, it just melts a little slower.
- Cold whole milk: 3 to 4 fl oz (90 to 120 ml). Whole milk gives the creamiest texture, but any milk you love will work.
- Ice cubes: Enough to fill a tall glass about three-quarters full.

The espresso-to-milk ratio matters more than you’d think. Too much milk and the foam gets lost in the glass. Too little and you’re drinking a weirdly strong coffee that bites back. Stick with the amounts above and you’ll land right in the sweet spot, the place where sweet and salty coffee just clicks.
You’ll also want a handheld frother or immersion blender, plus a liquid measuring cup. The frother is a cheap little tool, maybe ten bucks at Target or via Amazon, and honestly it’s worth every penny for this coffeehouse copycat drink alone.
How to Make a Salty Canadian Iced Latte
This recipe comes together in five minutes flat. No espresso machine required if you use instant espresso. Here are the four moves, broken down the way I wish someone had explained them to me the first time.
Stage 1: Prep the Glass
Fill a tall glass about three-quarters full with ice, then pour the cold milk over the top. Listen for that crackle. It’s the sound of summer in a cup, honestly. Set the glass aside and get your espresso situation ready.
Mistake I made the first time: I skipped this step and tried to layer everything at the end. Total mess. Watery drink. The milk goes in first, always. Once the foam is ready, you just pour and go.

Stage 2: Build the Espresso Base
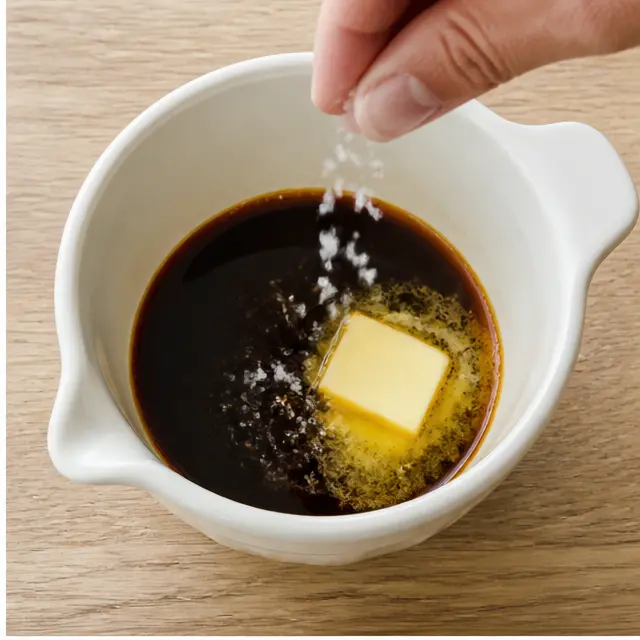
In a separate liquid measuring cup or small glass, combine the hot espresso, maple syrup, softened butter, and a pinch of fine sea salt. The espresso needs to be hot when it hits the butter. Cold espresso and butter don’t mix, they just lounge next to each other awkwardly and refuse to cooperate.
Here’s my confession. My first attempt at this iced latte recipe, the maple syrup sank straight to the bottom of my glass and I drank a layer of pure syrup at the end. It was like a sugar grenade waiting to go off. The fix is simple: blend everything together while the espresso is hot so the syrup and butter actually team up with the coffee instead of giving up.
Stage 3: Froth Until Velvety
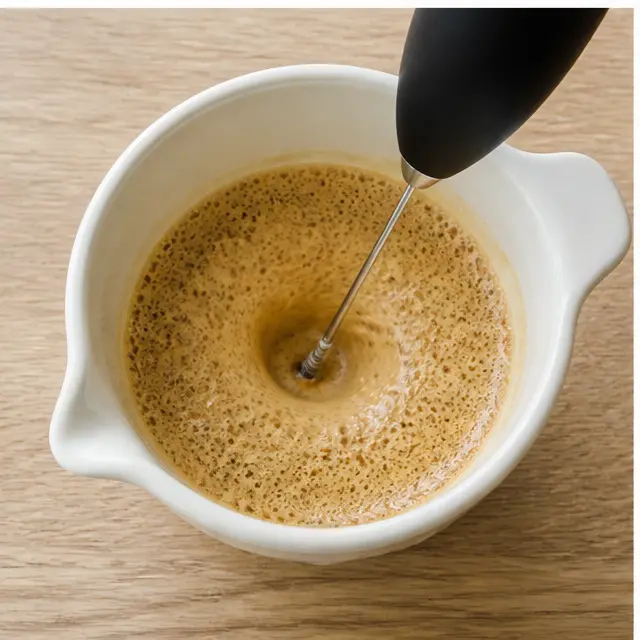
Immediately grab your handheld frother or immersion blender and blend the espresso mixture for 15 to 30 seconds. You’re looking for a thick, velvety foam with tiny bubbles, the color of golden amber. The butter melts completely into the espresso and turns into something that looks like a maple cappuccino foam, rich and glossy.
Wrong move: waiting too long. If the espresso cools down, the butter won’t emulsify and you’ll get greasy streaks floating in your cup. Froth right away and you’re golden. No frother? You can shake the espresso mixture in a sealed jar for about 30 seconds. It won’t be quite as thick, but it’ll still taste fantastic.
Stage 4: Pour and Serve
Slowly pour the foamy espresso mixture over the milk and ice. Watch it settle on top, that golden layer floating over the cold white milk, a little edible sunset. Then stir gently, or just sip and let the layers do their thing.
Serve immediately with or without a straw. The foam will start to separate if it sits too long, and the ice will dilute everything into a sad, watery mess. This is a summer iced coffee made to be enjoyed right away, not admired from across the counter while you answer emails.

Substitutions for a Salty Canadian Iced Latte
This iced maple latte is endlessly forgiving. Here are the swaps I’ve tested and actually enjoyed, coffee without an espresso machine included.
- No espresso machine? Use 1 to 2 teaspoons of instant espresso powder dissolved in 2 fl oz of hot water. That’s your espresso shot. Don’t use regular drip coffee, it’s too weak for the ratio to work.
- Dairy-free version: Swap the unsalted butter for dairy-free butter sticks, not the spreadable kind from a tub. Use barista-style oat milk or soy milk for a thicker, creamier foam. Quick warning: taste before adding extra salt, many dairy-free butters are already salted.
- Other milks: Coconut milk or almond milk work well too, though the foam will be a little lighter than whole milk. I like oat milk best for its neutral sweetness and way it holds the maple flavor.
- Sweetness and salt: Start with the recipe amounts, then make it yours. It’s your kitchen. Add more maple syrup if you have a sweet tooth, or an extra pinch of salt if you’re the kind of person who finishes a jar of salted caramel in a weekend.
- Optional add-ins: A few drops of vanilla extract or a light dusting of cinnamon can be nice, but the core drink doesn’t need any of that. Try the base version first, then get creative with your own spin.
Pro Tip for the Best Maple Butter Foam
One thing I wish I’d known from the start: the temperature timeline is everything. The espresso needs to be hot, the milk needs to be cold, and the drink needs to be sipped immediately. That contrast is what makes the salty Canadian iced latte so satisfying, that rush of warm maple foam meeting icy cold milk.
If you want a stronger maple presence, warm the maple syrup with the butter for a few seconds before adding the espresso. It deepens the flavor and makes the foam even more luxurious. I do this on cold mornings when I want the drink to feel extra cozy in the middle of summer.
Common Mistakes, Fixed
❌ Using regular coffee instead of concentrated espresso: The drink comes out watery and weak. Use 2 fl oz of espresso or dissolve instant espresso powder in hot water.
❌ Letting the drink sit before serving: The butter separates and the ice melts into everything. Serve immediately and give it a quick re-froth if you get distracted.
❌ Skipping the salt: The latte just tastes sweet instead of balanced. That tiny pinch does the heavy lifting, every single time.

Final Thoughts on This Viral Coffee Recipe
I’m not saying you’ll never buy coffee again. I’m saying that when you make this, you’ll look at your $7 iced latte habit differently, and you’ll realize what you’ve been missing. This iced latte recipe is a tiny ritual, a moment of self-care tucked into a busy day, and it costs pennies instead of a small fortune.
Make one this week. Make one this weekend. Make one for a friend who’s having a rough Monday and you’ll be a hero. And when you make it, save the recipe on Pinterest so you’ve always got it in your back pocket. When you make this salty Canadian iced latte, you’ll never look at iced coffee the same way again.

Salty Canadian Iced Latte with Maple Butter
Ingredients
Method
- Fill a tall glass about three-quarters full with ice and pour the cold milk over the ice.
- In a separate liquid measuring cup or small glass, combine the freshly pulled espresso, maple syrup, butter, and a pinch of salt.
- Immediately use a handheld frother or immersion blender to blend the espresso mixture until the butter melts completely and a thick, velvety foam forms.
- Slowly pour the foamy espresso mixture over the milk and ice, stir gently, and enjoy right away with or without a straw.
Nutrition
Notes
Tried this recipe?
Let us know how it was!Salty Canadian Iced Latte FAQ
Source: Learn More About This Dish
Is salt in my coffee really necessary?
It’s the sleeper ingredient. A small pinch of fine sea salt doesn’t make the drink taste salty. It sharpens the maple sweetness and rounds out the bitterness of the espresso, the same way salt works magic on caramel. Skip it and the latte tastes noticeably flatter, I promise.
What is a salted maple latte?
It’s the same drink under a different name. A salted maple latte combines espresso, real maple syrup, a touch of butter, and a pinch of salt, frothed together and poured over cold milk. The salty Canadian iced latte is the viral version of this drink that swept TikTok this summer.
How to make an iced salted maple latte?
Start with ice and cold milk in a tall glass. Then blend hot espresso with maple syrup, softened butter, and a pinch of salt using a handheld frother. Pour the foam over the milk, stir gently, and drink within a few minutes. Instant espresso powder works fine if you don’t have a machine.
Can I put maple syrup in an iced latte?
Absolutely. Maple syrup dissolves beautifully into hot espresso. For the salty Canadian iced latte, blend it with butter and salt while the espresso is hot so everything emulsifies into a smooth, velvety foam. Use real maple syrup, not pancake syrup, for the deepest flavor.
Does Starbucks have a salted maple latte?
Not on the regular menu, no. You can hack something similar by ordering an iced latte with maple syrup added, but you won’t get the maple butter foam that makes this drink special. That’s exactly why the homemade version is the way to go.