


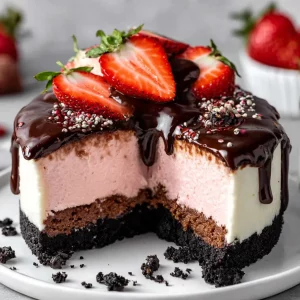


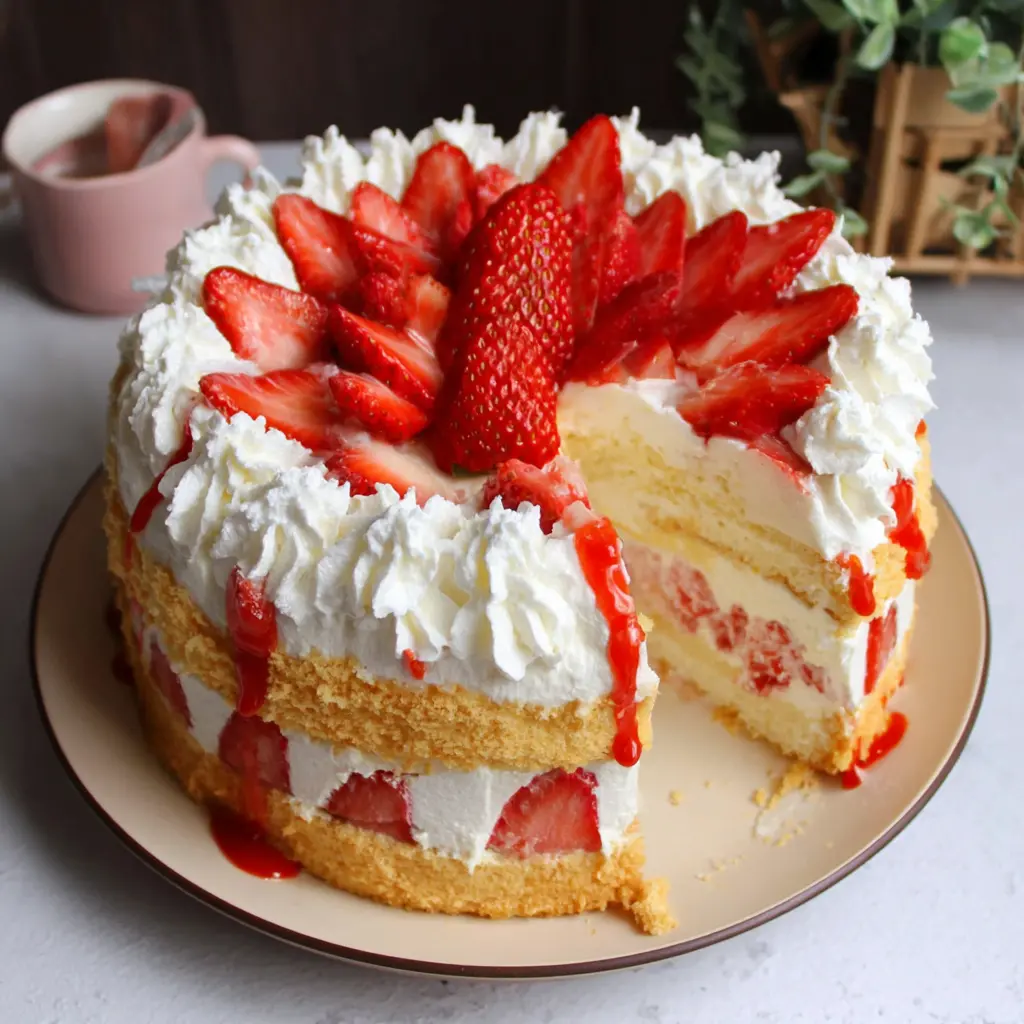
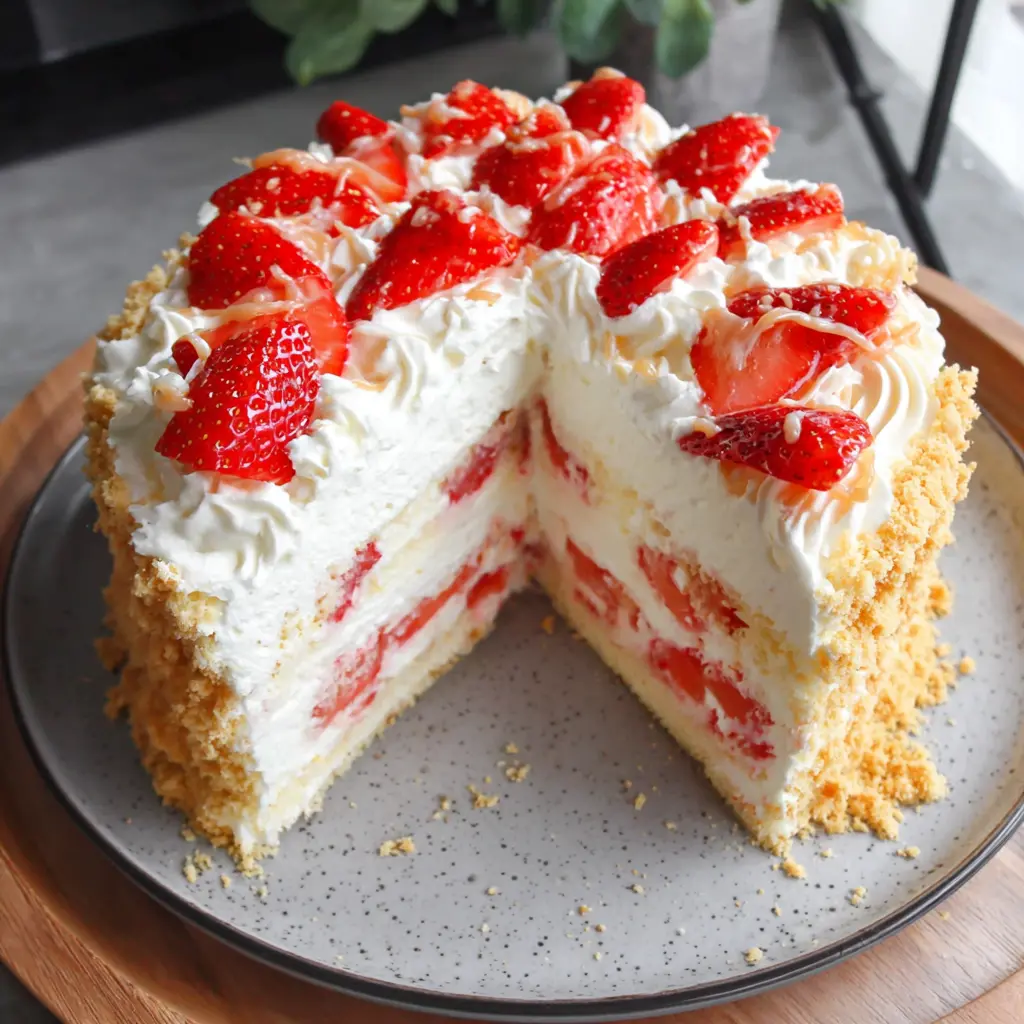
Strawberry Cream Cheese Charlotte Cake
Ingredients
Method
- Begin by preparing your 10-inch springform pan. This type of pan is crucial for easily removing the cake after it has chilled. Cut a circle of parchment paper that fits the bottom of the pan. This will prevent the cake from sticking and make removal seamless. Place the parchment circle at the bottom of the pan and close the springform latch. Set the prepared pan aside.
- In a small saucepan, combine the granulated sugar and water.
- Place the saucepan over medium heat and bring the mixture to a boil, stirring occasionally to help the sugar dissolve completely.
- Once boiling, reduce the heat to low and simmer gently for 2-3 minutes. Simmering helps to thicken the syrup slightly and ensures the sugar is fully dissolved.
- Remove the saucepan from the heat and set it aside to cool completely. The syrup needs to be cool before you dip the ladyfingers to prevent them from becoming too soggy.
- Quarter the washed and stemmed strawberries and place them in another small saucepan.
- Add the sugar and water to the strawberries in the saucepan.
- Place the saucepan over medium heat and bring the mixture to a simmer. Stir gently to dissolve the sugar.
- Once the sugar is dissolved and the strawberries have softened slightly, remove the saucepan from the heat.
- Carefully pour the hot strawberry mixture into a blender or food processor. Blend until completely smooth. Be cautious when blending hot liquids; vent the lid of your blender slightly to allow steam to escape and prevent pressure buildup.
- Pour the blended strawberry sauce through a fine-mesh strainer or sieve into a small bowl. Use a spatula or spoon to gently press the sauce through the strainer, leaving behind the seeds. This step is essential for achieving a smooth, seedless sauce with a refined texture.
- Set the bowl of strained strawberry sauce aside to cool completely. The sauce needs to be cool before incorporating it into the cream cheese filling.
- In a large, clean bowl (preferably chilled), pour the heavy whipping cream. Add the powdered sugar and vanilla extract. Using an electric mixer (handheld or stand mixer) with the whisk attachment, beat the mixture on medium-high speed until stiff peaks form. Stiff peaks mean that when you lift the beaters, the whipped cream holds its shape and the peaks stand straight up. Be careful not to overwhip, which can result in grainy or buttery whipped cream. Set the whipped cream aside.
- In a separate large bowl, place the softened cream cheese. Using the electric mixer with the paddle attachment (or beaters), beat the cream cheese on medium speed until it is smooth and creamy. Ensure there are no lumps.
- Gradually pour the cooled strawberry sauce into the beaten cream cheese. Mix on low speed until the sauce is fully incorporated and the mixture is well combined and evenly colored.
- Gently fold the whipped cream into the strawberry cream cheese mixture in two additions. Use a rubber spatula and a gentle folding motion to combine the mixtures. Folding helps to maintain the airiness of the whipped cream and create a light and fluffy filling. Mix until just combined; avoid overmixing, which can deflate the whipped cream.
- Gently fold in the chopped fresh strawberries into the filling. Distribute them evenly throughout the mixture.
- Take each ladyfinger and cut off about an inch (2.5 cm) from the bottom. This cut end will sit on the bottom of the pan and provide a flat base. Save the cut ends for later use. To ensure uniformity, you can line up a few ladyfingers side by side and cut them all at once to the same length.
- Working one at a time, quickly dip each ladyfinger in the cooled syrup. Dip them just long enough to moisten them slightly, about 1-2 seconds per side. Do not soak them for too long, or they will become too soggy and lose their structural integrity.
- Stand the syrup-dipped ladyfingers upright around the inside edge of the springform pan, with the round sides facing outwards and the cut ends at the bottom. Arrange them tightly together to create a solid wall around the pan.
- Use the reserved cut ends and additional soaked ladyfingers to fill the bottom of the pan inside the ladyfinger wall. You may need to break or cut ladyfingers to fit snugly and create a complete bottom layer.
- Evenly spread half of the strawberry cream cheese filling over the ladyfinger base. Smooth the surface with a spatula.
- If desired, for an extra burst of fresh strawberry flavor in the middle, you can sprinkle some extra chopped fresh strawberries over the filling layer. This is optional but enhances the strawberry experience.
- Arrange another layer of syrup-soaked ladyfingers over the filling and chopped strawberries (if using). Again, cut or break ladyfingers as needed to create a complete layer.
- Spread the remaining strawberry cream cheese filling on top of the second ladyfinger layer. Smooth the surface evenly.
- Cover the springform pan tightly with plastic wrap, ensuring the plastic wrap touches the surface of the filling to prevent skin from forming. Refrigerate the cake for at least 4 hours, or preferably overnight. Chilling allows the ladyfingers to soften and the flavors to meld together beautifully, resulting in the perfect Charlotte cake texture and taste.
- When ready to serve, or a couple of hours before, prepare the topping. In a clean, chilled bowl, pour the heavy whipping cream. Add the powdered sugar and vanilla extract. Beat with an electric mixer until stiff peaks form, just like you did for the filling.
- Remove the chilled cake from the refrigerator. Unlatch the springform pan and carefully remove the outer ring.
- You can either pipe the whipped cream topping decoratively onto the cake using a piping bag and tip, or simply spread it evenly over the top of the cake with a spatula.
- Arrange sliced fresh strawberries on top of the whipped cream topping for garnish. Get creative with your arrangement!
- Slice the Strawberry Charlotte Cake into wedges and serve immediately.
- Cover any leftover cake tightly with plastic wrap and store it in the refrigerator. It will keep well for up to 2-3 days. The ladyfingers will continue to soften over time, so it is best enjoyed within the first couple of days.
Nutrition
Notes
Tried this recipe?
Let us know how it was!I Used to Be Terrified of Caramel
I’ve had more caramel disasters than I care to admit. Burnt sugar that smelled like a chemistry experiment. Grainy crystallized messes that looked like sand. And one memorable attempt that turned into a brick so hard I could’ve used it as a doorstop. Honestly, I almost gave up on layered cakes entirely. But then I discovered one simple rule that changed everything. Use a wet pastry brush to wash down the sugar crystals from the sides of the pan. That’s it. That’s the game changer.
This strawberry caramel cream cake is the result of all those failures. And I promise, it’s easier than you think. The combination of tender vanilla sponge, silky caramel, fresh strawberries, and a creamy, stabilized filling creates something that looks like it came from a fancy bakery. But you’re making it in your own kitchen. Probably in your pajamas. No judgment here.
With strawberry season hitting its peak right now, and spring celebrations like Mother’s Day and graduations coming up, this is the cake that will have people asking for the recipe before they finish the first bite. I mean, who doesn’t love a layered caramel berry dessert that tastes this good?
Why You’ll Love This Strawberry Caramel Cream Cake
Let me tell you why this recipe works. First, the sponge is a simple butter cake that’s sturdy enough to hold all those beautiful layers without falling apart. It’s not one of those delicate cakes that crumbles the second you look at it. This one has structure. The secret is room-temperature ingredients. I know, I know, everyone says that. But here’s the thing: when your butter, eggs, and milk are all at the same temperature, they emulsify properly. That means a tender crumb that doesn’t dry out.
Second, the caramel. Oh, the caramel. It’s a simple homemade caramel sauce that comes together in about 10 minutes. No candy thermometer needed. You just watch the color and trust your eyes. It should be the color of a new penny and smell like toasted sugar. That’s when you know it’s ready. And because we’re adding cream at room temperature, it won’t seize up on you. Trust me on this.
Third, the cream filling. We’re using a stabilized whipped cream with cream cheese. This isn’t being fussy, it’s the difference between a cake that weeps overnight and one that stays beautiful for days. The cream cheese adds just enough tang to balance the sweetness of the caramel and strawberries. It’s perfect.
And finally, the strawberries. Fresh strawberries, sliced and tossed with a little sugar, then drained in a colander for 15 minutes. This simple step saves your cake from getting soggy. You’ll thank me later.
Ingredients for Strawberry Caramel Cream Cake
Before we dive into the process, let’s talk about what you’ll need. The beauty of this recipe is that most of these ingredients are pantry staples. You probably already have sugar, vanilla, and cream cheese in your fridge. If not, a quick trip to Ralphs or Vons will sort you out.
For the caramel, you’ll need granulated sugar and water. That’s it. No corn syrup, no lemon juice, no fuss. Just sugar and water, cooked until amber and beautiful. Then you’ll stir in heavy whipping cream and a pinch of salt if you like. The result is a silky, pourable caramel that sets into a gorgeous ribbon between the layers.
For the cream filling, we’re using cream cheese, heavy whipping cream, powdered sugar, and vanilla extract. The cream cheese needs to be softened to room temperature. I usually take it out of the fridge about an hour before I start baking. Set a timer. You’ll forget otherwise. I do it all the time.
The ladyfingers, or Savoiardi, are what make this cake so special. They absorb just enough moisture from the cream and strawberries to soften slightly, but they still hold their shape. You can find them at most grocery stores near the cookies or in the international aisle. Whole Foods carries them too.
And of course, fresh strawberries. Look for ones that are bright red, fragrant, and firm. The ones at the Santa Monica Farmers Market right now are amazing. Sweet and juicy, perfect for this cake.
Step-by-Step Instructions for the Perfect Cake
Alright, let’s get into the process. I’m going to walk you through each component separately. This way, you can tackle them one at a time without feeling overwhelmed. And honestly, you can make the caramel and the cream filling a day ahead. That’s what I do. It makes assembly day so much easier.
Making the Caramel Sauce
Start with a clean, heavy-bottomed saucepan. I use my stainless steel one. Add 1 cup of granulated sugar and 1/4 cup of water. Swirl the pan gently to combine. Don’t stir. Seriously, don’t stir. Stirring introduces air and can cause crystallization.
Place the pan over medium heat. As the sugar dissolves and starts to bubble, use a wet pastry brush to wash down any sugar crystals that form on the sides of the pan. This is the trick I mentioned. Those crystals are the enemy. They’ll turn your caramel grainy faster than you can say “ruined dessert.”
Watch the sugar as it cooks. It’ll go from clear to pale yellow to amber. You’re looking for a deep amber color, like a new penny. The smell will change too. It goes from sweet to nutty to almost toasty. That’s your cue. As soon as it reaches that color, remove the pan from the heat and carefully pour in 1/2 cup of heavy whipping cream. It’ll bubble up and steam. Don’t panic. That’s normal. Whisk until smooth.
Let the caramel cool completely before using it. I usually pour it into a glass jar and let it sit on the counter for about an hour. It’ll thicken as it cools. If it gets too thick, gently rewarm it with a splash of cream. You’ll be amazed at how easy this is.
Preparing the Strawberries
While the caramel cools, prep your strawberries. Wash them, hull them, and slice them about 1/4 inch thick. Toss them with a tablespoon of granulated sugar and let them sit in a colander over a bowl for 15 minutes. The sugar draws out some of the moisture. This is what prevents a soggy cake. Drain the liquid that collects in the bowl. You can save it for cocktails or smoothies if you want.
Making the Cream Filling
In a large bowl, beat 8 ounces of softened cream cheese with 1/2 cup of powdered sugar until smooth. Add 1 teaspoon of vanilla extract and mix. In a separate bowl, whip 1 1/2 cups of heavy whipping cream with 1/4 cup of powdered sugar until stiff peaks form. Fold the whipped cream into the cream cheese mixture gently. Don’t overmix. You want it light and fluffy.
This stabilized cream filling is amazing. It holds its shape, doesn’t weep, and has just the right amount of tang to cut through the sweetness. I love this stuff.
Assembling the Cake
Now for the fun part. You’ll need a springform pan or a deep dish. Line the bottom with parchment paper. Start with a layer of ladyfingers, arranged closely together. Brush them lightly with some of the strawberry juice you saved. Trust me, it adds flavor.
Spread a layer of the cream filling over the ladyfingers. Arrange a layer of sliced strawberries on top. Drizzle with caramel sauce. Repeat the layers: ladyfingers, cream, strawberries, caramel. End with a top layer of cream and a final drizzle of caramel.
Cover the pan with plastic wrap and refrigerate for at least 4 hours, or overnight. This is crucial. The ladyfingers need time to soften and absorb all those flavors. The cake needs to set. Be patient. I know it’s hard. But the results are worth it.
What Success Looks Like
When you remove the springform pan, the cake should hold its shape perfectly. The ladyfingers will be soft but not mushy. The cream will be firm and sliceable. And when you cut into it, you’ll see those beautiful distinct layers: golden sponge, creamy white filling, ruby strawberries, and ribbons of amber caramel. That’s the moment you’ll feel like a pastry chef.
Tips for the Perfect Strawberry Caramel Cream Cake
I’ve made this cake about a dozen times now. Some were better than others. Here’s what I’ve learned.
Use room temperature ingredients. I know I said this already, but it’s worth repeating. Cold cream cheese will leave lumps in your filling. Cold butter won’t cream properly. Take everything out of the fridge an hour before you start.
Watch the caramel like a hawk. It goes from perfect to burnt in about 30 seconds. Don’t walk away. Don’t check your phone. Just stand there and watch it. The color should be a deep amber, like the color of peanut butter. Not darker. Trust your eyes.
Drain your strawberries. This is non-negotiable. If you skip this step, your cake will be a soggy mess. I learned this the hard way. The first time I made this cake, I just tossed the strawberries in without draining them. The ladyfingers turned into a wet sponge. Not good.
Let the cake set overnight if you can. Four hours is the minimum. But overnight is better. The flavors meld together, the texture becomes perfect, and the cake slices cleanly. I usually make this the day before I plan to serve it. It takes the stress out of entertaining.
Use a deep baking tray for a tall cake. If you want those impressive tall layers, use a deeper pan. A regular 9-inch springform pan works fine, but a deeper one gives you more height. Just adjust the amount of ladyfingers and filling accordingly.
Common Mistakes to Avoid
Mistake: The caramel crystallized and turned grainy.
Solution: You probably stirred the sugar while it was cooking, or you didn’t wash down the crystals from the sides of the pan. Next time, use a wet pastry brush to keep those crystals in check. And for goodness’ sake, don’t stir.
Mistake: The cream filling is too runny.
Solution: Your cream cheese was too cold, or you overwhipped the cream. Make sure the cream cheese is softened to room temperature. And stop whipping the cream as soon as it holds stiff peaks. Overwhipping turns it into butter.
Mistake: The cake is soggy.
Solution: You didn’t drain the strawberries, or you added too much caramel. Remember to toss the strawberries with sugar and drain them for 15 minutes. And go easy on the caramel between the layers. A little goes a long way.
Mistake: The ladyfingers are too hard.
Solution: You didn’t let the cake set long enough. The ladyfingers need at least 4 hours to soften. Overnight is better. Be patient. I know it’s hard, but the results are worth it.
Storage and Leftovers
This cake stores beautifully. Keep it covered in the refrigerator for up to 3 days. The flavors actually get better after a day or two. The caramel soaks into the ladyfingers, the cream sets perfectly, and the strawberries soften just a bit.
If you’re not planning to finish the cake on the same day, consider using dried strawberries instead of fresh. Fresh strawberries can get brown and weepy after a couple of days. Dried strawberries hold up much better. You can find them at Trader Joe’s or Whole Foods.
To serve, let the cake sit at room temperature for about 15 minutes. This takes the chill off and makes the flavors more pronounced. Slice with a sharp knife, wiping the blade clean between cuts. That’s how you get those beautiful clean slices.
Can you freeze this cake? Honestly, I wouldn’t. The cream filling doesn’t freeze well, and the ladyfingers get mushy when thawed. It’s best enjoyed fresh or within a few days. But that’s never been a problem for me. This cake disappears fast.
Variations and Substitutions
One of the things I love about this strawberry caramel cream cake is how adaptable it is. Here are some ideas to make it your own.
Swap the ladyfingers. If you can’t find Savoiardi, you can use sponge cake layers instead. Just bake a simple vanilla sponge in two 9-inch rounds and use those as your base. The texture will be different, but it’ll still be delicious.
Use mascarpone instead of cream cheese. Mascarpone is richer and creamier, with a milder tang. It makes the filling even more luxurious. Just substitute it 1:1 for the cream cheese. You’ll love it.
Add a layer of chocolate. If you’re a chocolate fan, drizzle some melted dark chocolate between the layers. The combination of chocolate, caramel, and strawberries is amazing. Just make sure the chocolate is completely cool before you add it.
Make it gluten-free. Use gluten-free ladyfingers or gluten-free sponge cake. Most brands work well. Just check the package for instructions. The rest of the ingredients are naturally gluten-free.
Go dairy-free. Use dairy-free cream cheese and coconut cream instead of heavy whipping cream. The texture will be slightly different, but it’s still delicious. I’ve made it this way for friends with dairy allergies, and they loved it.
Frequently Asked Questions
Make-Ahead Tips for Stress-Free Entertaining
If you’re planning to serve this strawberry caramel cream cake for a special occasion, here’s my recommended timeline. It takes the pressure off and lets you enjoy the party.
Two days before: Make the caramel sauce. Let it cool completely, then store it in a jar in the refrigerator. Make the cream filling too. Keep it covered in the fridge.
One day before: Assemble the cake. Layer the ladyfingers, cream, strawberries, and caramel in the springform pan. Cover and refrigerate overnight. The cake will be perfectly set by the time you’re ready to serve.
Day of: Remove the cake from the fridge about 15 minutes before serving. Unmold it, slice it, and watch everyone’s faces light up. You’ll feel like a hero. And honestly, you kind of are.

Final Thoughts
When you slice into this cake and see those beautiful layers of golden sponge, creamy white filling, ruby strawberries, and ribbons of amber caramel, you’ll feel like a pastry chef. I promise. This is the cake that will have people asking for the recipe before they finish the first bite. It’s that good.
If your caramel thickens too much while you’re assembling, gently rewarm it with a splash of cream. If your cream filling seems too soft, pop it in the fridge for 15 minutes. And if you’re nervous about the whole thing, just remember: I’ve made every mistake in the book, and the cake still turned out amazing. You’ve got this.
For more inspiration and variations, check out my Pinterest boards. I share tons of ideas there. And when you make this cake, tag me. I can’t wait to celebrate with you.
How do you make a strawberry caramel cream cake with ladyfingers?
Layer ladyfingers with cream filling, fresh strawberries, and homemade caramel in a springform pan. Refrigerate for at least 4 hours so the ladyfingers soften. The result is a beautiful layered caramel berry dessert that slices cleanly and tastes amazing.
Can I use frozen strawberries for this strawberry caramel cream cake?
I wouldn’t recommend it. Frozen strawberries release a lot of water when they thaw, which will make the cake soggy. Fresh strawberries are best. If fresh aren’t available, try using dried strawberries instead. They hold up much better and won’t ruin the texture.
What is the best way to store leftover strawberry caramel cream cake?
Keep it covered in the refrigerator for up to 3 days. Let it sit at room temperature for 15 minutes before serving to take the chill off. Don’t freeze it, as the cream filling doesn’t thaw well. I promise it’ll be gone before you need to worry about storage anyway.
How long does it take to assemble a layered caramel berry dessert like this?
The actual assembly takes about 15 minutes once your components are ready. But you need to factor in cooling time for the caramel (about 1 hour) and setting time for the cake (at least 4 hours). I usually make the caramel and cream filling the day before, then assemble and refrigerate overnight.
Can I substitute cream cheese with mascarpone in this strawberry cream cheese charlotte cake?
Absolutely. Mascarpone is a great substitute for cream cheese in this recipe. It’s richer and creamier with a milder tang. Use it 1:1. The filling will be even more luxurious. Just make sure it’s softened to room temperature before you beat it with the powdered sugar.
Can I make this cake ahead of time for a party?
Yes, and I actually recommend it. Make the caramel and cream filling up to 2 days ahead. Assemble the cake the day before your event. The extra time in the fridge allows the flavors to meld and the ladyfingers to soften perfectly. Just keep it covered so it doesn’t absorb fridge odors.
Why did my caramel turn out grainy?
Grainy caramel usually means sugar crystals formed during cooking. This happens when you stir the sugar, or when crystals on the sides of the pan fall back into the mixture. Use a wet pastry brush to wash down the sides of the pan. And don’t stir. Just swirl the pan gently.
Can I use store-bought caramel sauce instead of making my own?
You can, but the texture and flavor won’t be the same. Homemade caramel has a deeper, more complex flavor and a thicker consistency that works better for layering. Store-bought sauces are often too thin and can make the cake soggy. Honestly, homemade is worth the 10 minutes.
How do I get clean slices of this cake?
Use a sharp, thin-bladed knife. Wipe it clean between each cut. For the cleanest slices, chill the cake for at least 4 hours, or overnight. The ladyfingers need time to soften and the cream needs to set. A warm cake will just fall apart on you.
What if I don’t have a springform pan?
You can use a regular 9-inch cake pan lined with plastic wrap. Just make sure the wrap extends over the edges so you can lift the cake out after it sets. Or use a deep dish. The key is having something with straight sides so the layers stay neat.