

Why You’ll Love This Crispy Chicken Parmesan Bowl
I’ve had one too many soggy chicken parm dinners. You know the ones. You order it at a restaurant, and by the time it hits the table, the breading is already this sad, wet mess. Or worse, you make it at home, and that beautiful golden crust you worked so hard for just collapses under the sauce. Honestly, it’s heartbreaking. But this bowl changed everything for me.
This Crispy Chicken Parmesan Bowl is the answer to all those late-night cravings for something crunchy, cheesy, and deeply satisfying. It’s got that perfect shatter when you cut into the chicken, the gooey pull of melted mozzarella, and a rich marinara that ties it all together. And the best part? It comes together in about 35 minutes. No deep fryer required, no complicated techniques. Just a few smart tricks that make all the difference.
I mean, who doesn’t want a restaurant-quality meal on a random Tuesday night? With spring here and fresh basil at the Santa Monica Farmers Market, it’s the perfect time to make this. Trust me, once you try this method, you’ll never go back to the sad, soggy version again.
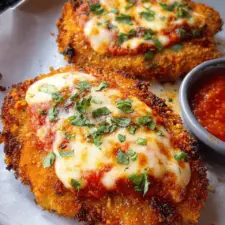
Crispy Chicken Parmesan Bowl with Marinara
Ingredients
Method
- Preheat your air fryer to 190C/375F and lightly grease the basket.
- Pound the chicken breasts to about half an inch thick for even cooking.
- In one bowl, whisk the egg. In another bowl, mix panko breadcrumbs with salt, pepper, and Italian seasoning.
- Dip each chicken breast in the egg mixture, then coat with breadcrumbs.
- Place the breaded chicken in the air fryer basket and cook for 9 minutes, flipping halfway through.
- Top each piece with marinara sauce and sprinkle mozzarella and parmesan cheese generously.
- Return to the air fryer and cook for an additional 2-3 minutes until cheeses are melted.
Nutrition
Notes
Tried this recipe?
Let us know how it was!Key Ingredients & Substitutions
The beauty of this Crispy Chicken Parmesan Bowl is that it doesn’t need a million ingredients. You probably have most of this stuff already. But getting the right ones makes a real difference.
Chicken. Small chicken breasts are ideal here. They cook through faster and stay juicier. If you’ve only got big ones, just butterfly them or pound them thin. That’s the real key.
Panko breadcrumbs. This is non-negotiable for me. Regular breadcrumbs just don’t give you that same craggy, super-crispy texture. Panko is lighter and flakier, so it fries up way crunchier. I get mine at Ralphs or Trader Joe’s.
Parmesan and mozzarella. You need both. The Parmesan adds that salty, nutty flavor to the crust, and the mozzarella gives you that epic cheese pull. I use pre-shredded mozzarella for convenience, but if you shred it yourself, it melts even better.
Marinara sauce. A good jarred sauce is totally fine here. I usually grab a jar from Whole Foods or Vons and doctor it up with a pinch of Italian seasoning. Just make sure it’s not too watery. A thick sauce keeps the breading crisp.
If you’re looking for swaps, you can use gluten-free panko for a GF version. For a lower-carb option, skip the pasta and serve it over zucchini noodles or a big arugula salad. It’s super adaptable.
Step-by-Step Instructions
Alright, let’s get into the actual process. I’ll walk you through it step by step, so there’s no guesswork.
Prep the chicken. First, pat those chicken breasts dry with paper towels. This is huge. If the chicken is wet, the breading won’t stick and you’ll get patchy, sad spots. Season them generously with salt, pepper, and Italian seasoning on both sides.
Set up your dredging station. You need two shallow bowls. In one, beat a large egg with a splash of water. In the other, mix the panko breadcrumbs with a good handful of grated Parmesan. The cheese in the breadcrumbs adds flavor and helps them brown beautifully.
Coat the chicken. Dip each breast into the egg, letting the excess drip off. Then press it firmly into the panko mixture. Make sure every single spot is covered. No bare spots allowed. I use one hand for wet and one for dry to avoid turning my fingers into a gluey mess.
Fry it right. Heat about a quarter-inch of olive oil in a large skillet over medium-high heat. You want the oil shimmering but not smoking. That’s around 350°F if you’re using a thermometer. Gently lay the chicken in the pan. Don’t crowd it. Cook for 3-4 minutes per side until deeply golden brown and cooked through.
The rack trick. Here’s the secret. Do not rest your fried chicken on paper towels. That traps steam and makes the breading soggy instantly. Instead, transfer the chicken to a wire rack set over a baking sheet. This lets air circulate all around, keeping that crust perfectly crisp.
Assemble the bowl. While the chicken rests, warm your marinara sauce in a small pot. Cook your spaghetti or whatever pasta you like. To build the bowl, start with the pasta, spoon on some sauce, place the crispy chicken on top, add more sauce, and shower it with mozzarella and a little extra Parmesan. Pop it under the broiler for 2-3 minutes until the cheese is bubbly and browned. Finish with fresh basil.
Tips for Extra Crispy Chicken
Getting that perfect crunch isn’t about luck. It’s about a few specific techniques. Here’s what I’ve learned from making this Crispy Chicken Parmesan Bowl way too many times.
Dry the chicken well. I already said this, but it bears repeating. Moisture is the enemy of crispiness. Pat those breasts dry like your life depends on it.
Don’t skip the resting. After breading, let the chicken sit on a plate for 5 minutes. This helps the coating adhere so it doesn’t slide off in the pan. I learned this the hard way after losing half my breading to the oil.
Oil temperature matters. If the oil isn’t hot enough, the chicken absorbs grease and turns soggy. If it’s too hot, the outside burns before the inside cooks. Medium-high heat, a shimmering surface, and that 350°F sweet spot is where you want to be.
Shallow fry, don’t deep fry. You don’t need a vat of oil. A quarter-inch depth is plenty. The chicken doesn’t need to be submerged. You’ll flip it halfway, and both sides will get that beautiful golden brown color.
Use a rack, not paper towels. I’ve said it once, I’ll say it again. Paper towels create steam. A wire rack creates air. Air equals crunch. It’s that simple.
Variations to Try
Once you’ve mastered the basic Crispy Chicken Parmesan Bowl, you can play around with it. Honestly, that’s half the fun.
Air fryer version. If you want to skip the stovetop, the air fryer works great. Preheat to 400°F, spray the breaded chicken with oil, and cook for 10-12 minutes, flipping halfway. It won’t be quite as golden as pan-frying, but it’s still darn good and uses way less oil.
Baked version. For a hands-off approach, bake the breaded cutlets on a wire rack over a sheet pan at 425°F for about 20-25 minutes. They won’t be as crispy as fried, but they’ll still taste amazing. This is my go-to on busy weeknights.
Low-carb bowl. Skip the pasta entirely. Serve the chicken and sauce over a bed of sautéed spinach or zucchini noodles. Or just eat it as a standalone plate with a side salad. It’s still a complete meal.
Spicy kick. Add red pepper flakes to the panko mixture or stir some into the marinara. It gives the whole dish a nice little warmth without overpowering the cheese.
Pesto twist. Swap the marinara for pesto. It’s not traditional, but it’s so good. The basil and garlic in the pesto pair perfectly with the crispy chicken and melty mozzarella.
Common Mistakes & Fixes
Mistake: The breading falls off in the pan.
Solution: Your oil probably wasn’t hot enough. Let it heat up properly before adding the chicken. Also, make sure you pressed the breading on firmly.
Mistake: The chicken is dry and overcooked.
Solution: You cooked it too long or the breasts were too thick. Pound them to an even thickness, about half an inch. They cook faster and more evenly.
Mistake: The crust gets soggy after adding sauce.
Solution: Don’t drown the chicken. Use a light hand with the sauce. And always serve it immediately after broiling the cheese. The longer it sits, the softer it gets.
Mistake: The cheese doesn’t melt properly.
Solution: Shred your own mozzarella if you can. Pre-shredded cheese has anti-caking agents that prevent smooth melting. And give it enough time under the broiler.
Storage & Reheating Guide
Leftovers are a reality, and this Crispy Chicken Parmesan Bowl handles them pretty well if you do it right. The key is storing components separately.
Storage. Keep the chicken, pasta, and sauce in separate airtight containers in the fridge. They’ll stay good for up to 3 days. Don’t stack the chicken pieces on top of each other. That’s a recipe for crushed breading.
Reheating the chicken. This is where most people mess up. Do not microwave the chicken. It will turn into a soggy sponge. Instead, reheat it in the oven at 375°F on a wire rack over a sheet pan for about 10 minutes. It crisps right back up. An air fryer at 375°F for 5-7 minutes works even better.
Reheating the whole bowl. If you’ve already assembled the bowl, your best bet is the oven. Cover it loosely with foil and bake at 350°F until heated through, about 15 minutes. The foil prevents the cheese from burning while the chicken warms up.
Freezing. You can freeze the cooked, breaded chicken cutlets. Let them cool completely, then wrap them individually in plastic wrap and pop them in a freezer bag. They’ll keep for up to 2 months. Reheat directly from frozen in the oven or air fryer.
Frequently Asked Questions
What to Serve with This Bowl
This Crispy Chicken Parmesan Bowl is a meal in itself, but if you want to round it out, a few simple sides go a long way.
A simple green salad. Arugula dressed with lemon juice, olive oil, and shaved Parmesan is a classic pairing. The peppery greens cut through the richness of the cheese and sauce perfectly.
Garlic bread. Toasted sourdough rubbed with a garlic clove and drizzled with olive oil is hard to beat. It’s perfect for sopping up any extra marinara on the plate.
Roasted vegetables. Broccoli, asparagus, or zucchini tossed with olive oil, salt, and pepper and roasted at 425°F until tender and charred. They add color and a healthy element to the meal.
For a spring twist, try serving it with a side of sautéed peas and fresh mint. It’s light, bright, and totally in season right now.
Final Thoughts
When you pull that golden chicken from the oil and hear that shatter as you cut into it, you’ll know it was worth every step. This Crispy Chicken Parmesan Bowl is the kind of meal that makes a regular night feel special. It’s crunchy, it’s cheesy, it’s saucy, and it’s honestly easier than you think.
I’d love to see how yours turns out. Tag me when you make your bowl! And if you want more ideas, check out my Pinterest boards for tons of variations and inspiration. Your next favorite dinner is 30 minutes away. Go for it.
Can I make this Crispy Chicken Parmesan Bowl ahead of time?
Yes, but I recommend prepping components separately. Bread and fry the chicken, cook the pasta, and make the sauce. Store them all in separate containers. Assemble and broil the cheese right before serving for the best texture.
How do I keep the chicken crispy in a cheesy chicken pasta bowl?
The trick is to not drown the chicken in sauce. Use a light layer, and always leave some crispy edges exposed. Also, serve it immediately after broiling the cheese. The longer it sits, the softer the breading gets.
Can I use a different cheese instead of mozzarella?
Absolutely. Provolone, fontina, or even a mild cheddar would work. Each melts differently, but they all add a creamy, savory element. Just stick with something that melts well and has a mild flavor so it doesn’t overpower the dish.
What is the best way to reheat a Crispy Chicken Parmesan Bowl?
For the crispiest results, reheat the chicken separately in an air fryer at 375°F for 5-7 minutes or in a 375°F oven on a wire rack for 10 minutes. Warm the pasta and sauce in the microwave or on the stovetop, then assemble.
How many servings does this recipe make?
This recipe is written for 2 servings, using two small chicken breasts. It’s easy to double or triple for a larger crowd. Just make sure you don’t overcrowd the pan when frying. Cook in batches if needed.
Can I bake instead of frying the chicken?
Yes, you can bake the breaded cutlets on a wire rack over a sheet pan at 425°F for 20-25 minutes. They won’t be quite as crispy as pan-fried, but they’ll still be delicious. Spray them with oil first for better browning.
Is this recipe low-carb or keto-friendly?
As written, it’s not low-carb because of the panko breadcrumbs and pasta. For a lower-carb version, use almond flour or crushed pork rinds for the breading, and serve over zucchini noodles or a salad instead of pasta.
What can I serve with a savory parmesan chicken meal for a complete dinner?
This bowl is pretty complete on its own, but a simple arugula salad with lemon and shaved Parmesan is a great side. Garlic bread or roasted broccoli also work well. It’s a flexible dish that pairs with almost anything.