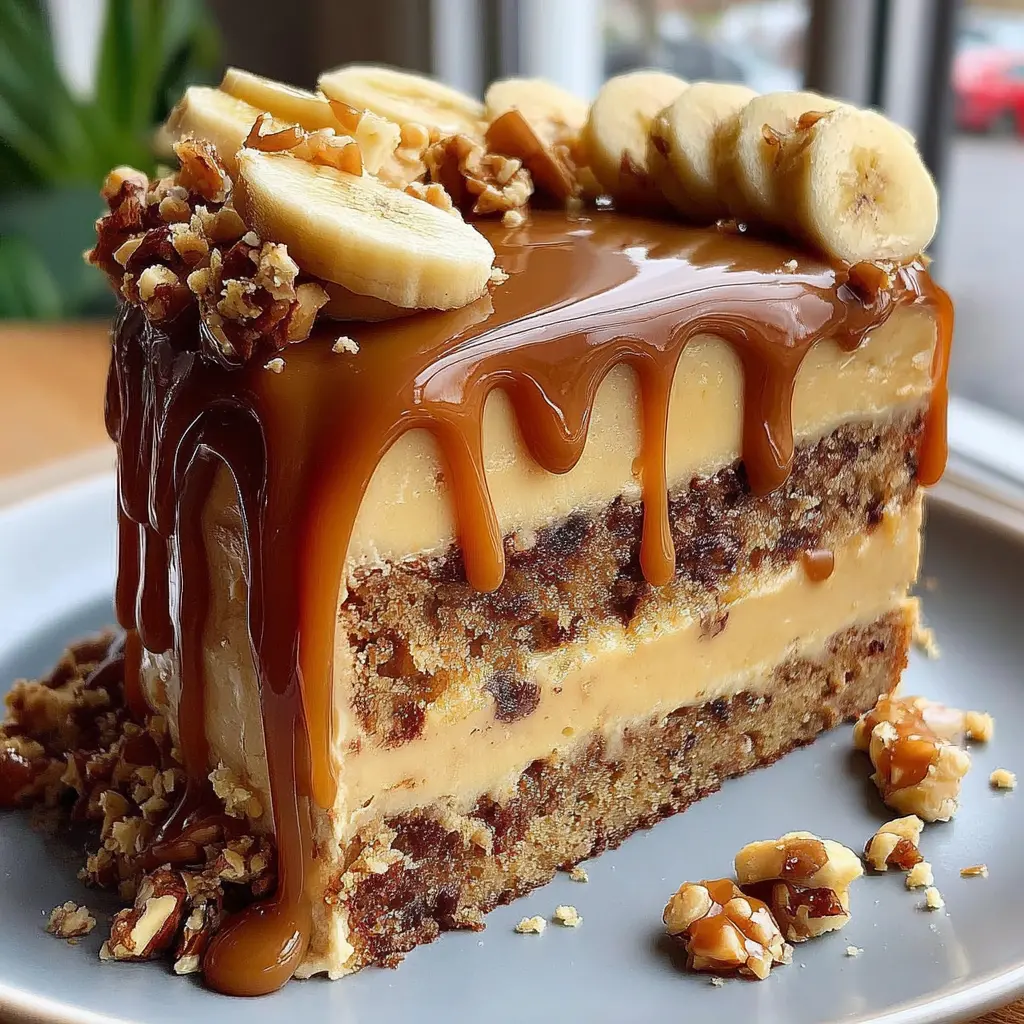
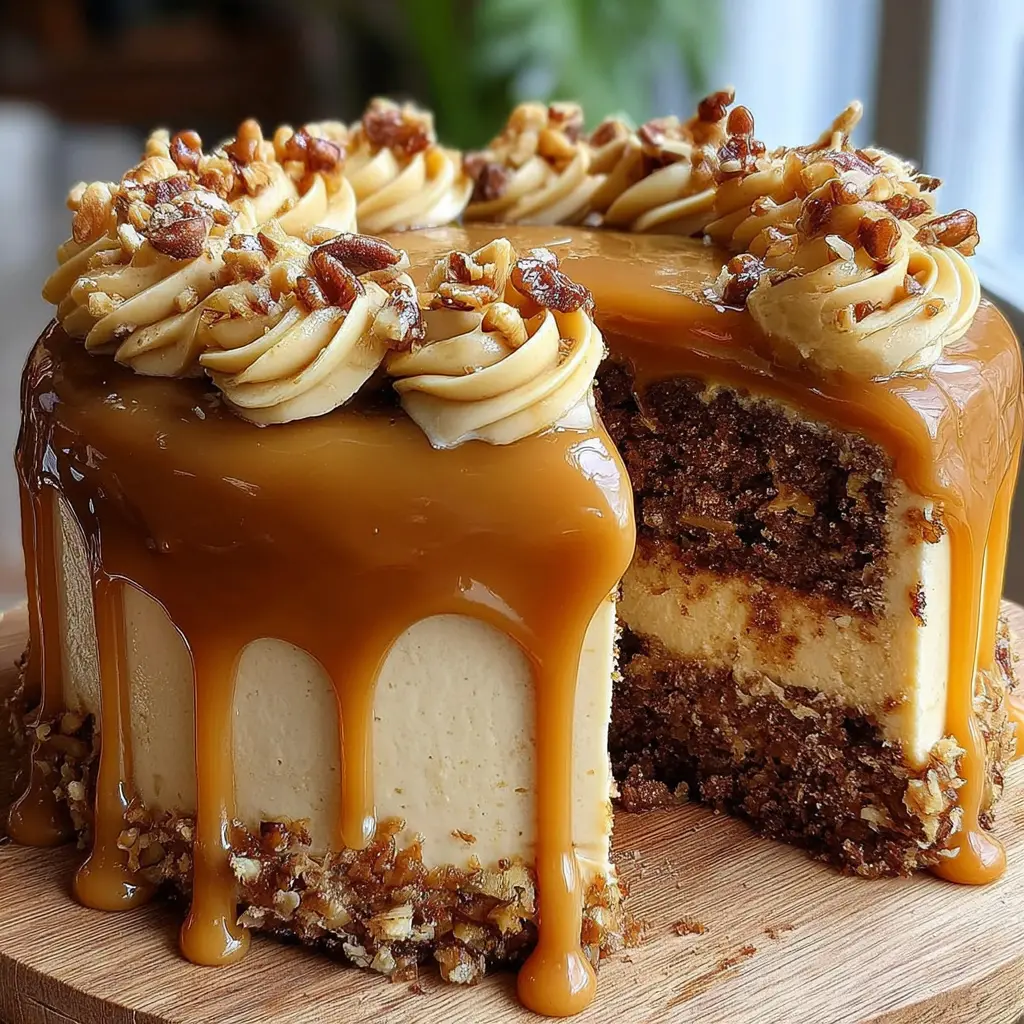
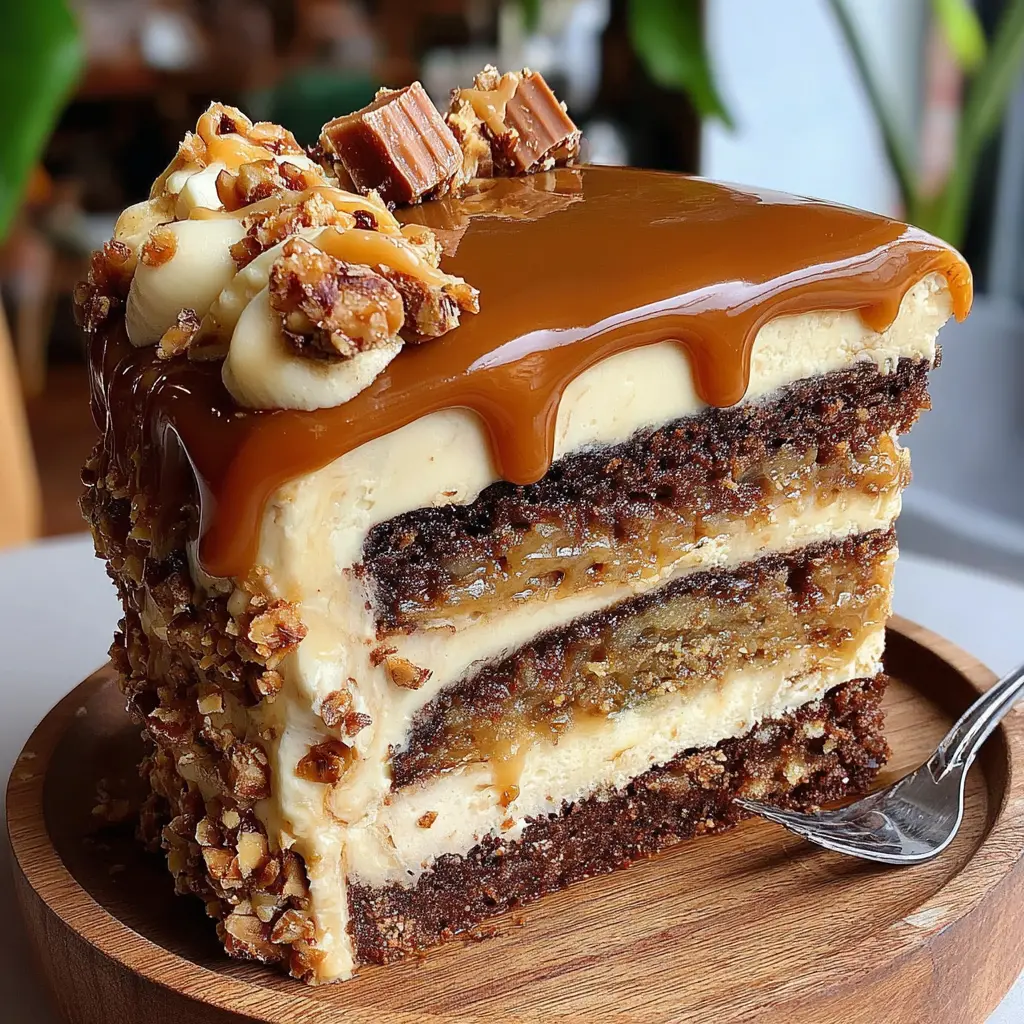
Salted Caramel Banana Toffee Layer Cake
Ingredients
Method
- Preheat the oven to 350°F. Grease, flour, and line the bottom of four 6-inch cake pans with parchment paper.
- Using a handheld or stand mixer fitted with the paddle attachment, beat the butter and sugar on high speed until light and fluffy.
- Next, add the eggs and vanilla, and mix until fully combined. Scrape down the sides of the bowl as needed.
- In a medium bowl, whisk together the flour, baking soda, and salt.
- Add the dry ingredients to the wet ingredients, alternating with the buttermilk.
- Lastly, mix in the mashed bananas until everything is well combined.
- Divide the batter evenly among the prepared cake pans. Bake for 40-45 minutes, or until a toothpick or cake tester inserted into the center comes out with just a few crumbs.
- Allow the cakes to cool in the pans on a wire rack for 10 minutes. Afterward, flip the pans over and let them cool completely upside down.
- In a microwave-safe dish or measuring cup, melt the salted caramel chips and heavy cream. Microwave in 15-second increments, stirring in between to prevent the mixture from seizing. Once smooth with no clumps, set aside to cool slightly.
- Using a handheld or stand mixer fitted with the paddle attachment, beat the butter until fluffy. Add the slightly cooled ganache to the butter and beat until smooth.
- With the mixer on low, gradually add the powdered sugar one cup at a time. Once all the powdered sugar is incorporated, increase the speed to high and whip for 3-5 minutes until the mixture is light and fluffy.
- In a microwave-safe dish or measuring cup, melt the salted caramel chips and heavy cream. Microwave in 15-second increments, stirring in between to prevent the mixture from seizing. Once smooth with no clumps, set aside.
- Level off the tops of the cake layers, if necessary, using a serrated knife or cake leveller.
- Spread a small amount of buttercream on the base of your cake plate or board to help hold the cake in place. Place the first cake layer down. Spread about 1/2 cup of buttercream over the first layer and top with about 1/4 cup of toffee bits.
- Place the second cake layer on top and repeat the process with buttercream and toffee bits. Do the same for the third layer.
- Place the fourth cake layer on top, with the top side facing down.
- Cover the entire cake with buttercream, smoothing the sides as necessary.
- Once the cake is evenly covered, chill it for 10 minutes in the freezer or 20 minutes in the fridge.
- If the ganache has cooled, gently warm it in the microwave in 10-second increments to prevent seizing.
- You can either use a squeeze bottle or spoon the ganache onto the cake. Apply a bit at the edge of the cake to let it drip down, repeating this all around the cake. Pour the remaining ganache onto the center of the top of the cake and spread evenly.
- Decorate the cake with the remaining buttercream and toffee bits as desired!
Nutrition
Notes
Tried this recipe?
Let us know how it was!My Family’s Banoffee Story
I used to think a three-layer cake was impossible. I mean, I’d tried. Oh honey, let me tell you about the time I attempted a birthday cake for my mother’s 60th. I spent two days on it. The layers were lopsided, the buttercream split, and the whole thing looked like a wrinkled tablecloth. I burst into tears in my kitchen, covered in food coloring. My mother came over, looked at the disaster, and said, “Honey, I’d rather have a bowl of your chocolate pudding anyway.” We ate that lopsided mess with forks straight from the plate, laughing at how terrible it looked.
But this Chocolate Caramel Banana Cake changed everything. I mean everything. It’s the cake that made me stop being scared of layered desserts. Maybe you’ve had the same banana cake nightmares. Dry sponge layers. Soggy middles. Caramel that turns into a rock. I’ve been there, friend. I’ve been wrong before, just ask my husband about the time I tried to make vegan cheese. But this recipe? It’s the one that finally worked.
The first time I pulled this Chocolate Caramel Banana Cake out of the oven, the scent of ripe bananas filled my kitchen and mixed with the chocolate. I remember standing there, spatula in hand, thinking, “This is the best thing I’ve made all month, I swear on my cast iron skillet.” And it was. The layers came out soft and tender. The caramel dripped perfectly down the sides. And the first bite where chocolate, caramel, and banana meld together? That’s a hill I will die on, and that hill is made of butter.
Why This Chocolate Caramel Banana Cake Works
So what makes this one different from all those other banana cakes that let you down? It’s not magic, though it might taste like it. It’s a few simple techniques that make all the difference. Trust me on this one, it’s life-changing.
First, we use very ripe bananas. I’m talking brown spots, almost looking too far gone. Those bananas are packed with concentrated flavor and natural sweetness. Bless your heart in the genuinely kind Southern way, not the passive-aggressive way, but if you use yellow bananas, you’ll get a bland cake. Don’t do it.
Second, room temperature ingredients. I know, I know, you’re busy and you forgot to take the eggs out. But here’s the thing: room temperature butter, eggs, and buttermilk create a better emulsion. That means a lighter, fluffier cake. It’s not being fussy, it’s the difference between a good cake and a great one.
And third, we don’t overmix. When you add the flour, stop as soon as it’s combined. I mean it. Walk away. Overmixing develops gluten, and gluten makes tough cake. We want tender, not tough.
Ingredients for Chocolate Caramel Banana Cake
Let’s talk about what you’ll need. And I mean, I’m no expert, but I’ve made this cake about a dozen times now, so I’ve got some thoughts. You might want to taste it first before you take my word for it, but here goes.
For the cake layers, you’ll need unsalted butter, granulated sugar, eggs, all-purpose flour, baking soda, salt, buttermilk, mashed bananas, and vanilla extract. And toffee bits. Oh, the toffee bits are where the magic happens. They add little pockets of caramelized sweetness throughout the sponge. It’s not a mistake, it’s a new recipe, and this one is a winner.
For the frosting, we use more unsalted butter, salted caramel baking chips, heavy cream, and powdered sugar. The salted caramel baking chips are the secret weapon here. They give the frosting that perfect balance of sweet and salty without you having to make caramel from scratch. Though I’ll show you how to do that too if you’re feeling ambitious.
And for the ganache drizzle? More salted caramel baking chips and heavy cream. Simple. Elegant. Delicious.
Step-by-Step Instructions
Put the kettle on, this is going to take a minute. But I promise, once you understand the flow, it’s easier than it looks.
Start by preheating your oven to 350°F. Grease three 8-inch cake pans and line the bottoms with parchment paper rounds. This step is non-negotiable if you want clean release. I learned that the hard way when I spent twenty minutes trying to pry a stuck cake layer out of a pan. Not fun.
In a medium bowl, whisk together the flour, baking soda, and salt. Set that aside. In a large bowl, cream the butter and sugar until light and fluffy. This takes about 3-4 minutes with a hand mixer or stand mixer. Don’t rush it. The sugar needs to dissolve into the butter to create that tender crumb.
Add the eggs one at a time, beating well after each. Then add the vanilla. Now, alternate adding the flour mixture and the buttermilk, starting and ending with flour. Mix until just combined. Fold in the mashed bananas and toffee bits. The batter will be thick and smell incredible.
Divide the batter evenly among the three pans. Bake for 22-25 minutes, or until a toothpick inserted in the center comes out clean. Let them cool in the pans for 10 minutes, then turn out onto a wire cooling rack to cool completely.
While the cakes cool, make the frosting. Beat the butter until creamy, then add the melted salted caramel baking chips and heavy cream. Gradually add the powdered sugar and beat until fluffy. For the ganache, simply heat the cream and pour over the remaining caramel chips. Stir until smooth.
Once the cakes are completely cool, level them with a serrated knife if they domed. Place one layer on your cake stand, spread with frosting, and repeat. Frost the outside, then drizzle with ganache. Let it set for about 20 minutes before serving.
Essential Baking Equipment
You don’t need a professional bakery setup for this. I mean, I’ve made it in my tiny Asheville kitchen with the kids running around and the dog barking at squirrels. But a few tools make life easier.
You’ll want three 8-inch cake pans. I prefer light-colored metal pans because they conduct heat evenly. Dark pans can cause the edges to brown too fast. An offset spatula is worth its weight in gold for spreading frosting. And a wire cooling rack is essential for even cooling.
A cake stand makes the final presentation look professional, but a plate works fine. And parchment paper rounds? Just cut circles from regular parchment. It’s cheaper than buying pre-cut ones.
Tips for the Perfect Cake
Here’s what I wish someone had told me before I started making layered cakes. These tips will save you from the disasters I’ve already experienced. You’re welcome.
Use very ripe bananas with brown spots. This isn’t just a suggestion, it’s the foundation of the flavor. Green bananas won’t give you the sweetness or moisture you need. I literally dreamt about this recipe, and it turned out even better than the dream.
Room temperature ingredients ensure smooth mixing. Cold butter doesn’t cream well. Cold eggs can cause the batter to curdle. Take them out of the fridge about an hour before you start baking. If you forget, place the eggs in a bowl of warm water for 5 minutes.
Don’t overmix once flour is added. Stop as soon as you don’t see any more streaks of flour. Overmixing develops gluten and makes the cake tough. Low and slow is the way to go for brisket, for forgiveness, for everything that matters.
Level cake layers with a serrated knife if they domed. A flat top makes stacking so much easier. Use a gentle sawing motion and rotate the cake as you cut.
Variations to Try
Once you’ve mastered the base recipe, you can play around. I’m not saying this is the only way to do it, but it’s the way that’s never failed me.
For a different chocolate profile, you could try milk chocolate for a sweeter frosting or white chocolate for a contrast with the caramel. If you’re feeling nutty, add about 60 grams of chopped walnuts or pecans to the batter. The crunch is lovely.
Want a smaller cake? Halve the recipe to make a two-layer 20 cm cake. Perfect for a smaller gathering. For a dairy-free option, use plant-based butter and non-dairy milk. I’ve tested it with oat milk and it works beautifully.
Serving Suggestions
This Chocolate Caramel Banana Cake is a showstopper on its own, but a few extras never hurt. Serve it with vanilla ice cream and an extra drizzle of caramel sauce. Or pair it with a cup of strong coffee or espresso. The bitterness cuts through the sweetness perfectly.
Fresh whipped cream on the side is always a good idea. And if you want a tart contrast, add some fresh strawberries or raspberries. The acidity balances the rich chocolate and caramel.
How to Store Leftovers
If you have leftovers, which is rare in my house, here’s what to do. Store the cake in an airtight container in the refrigerator for 3-5 days. Let it sit at room temperature for about 30 minutes before serving. This takes the chill off and lets the flavors shine.
You can also wrap individual slices in plastic wrap and freeze them for up to 3 months. Thaw in the refrigerator overnight. For the whole cake, freeze the unfrosted layers wrapped tightly in plastic wrap and foil. Frost when you’re ready to serve.
Make-ahead buttercream can be stored in the fridge for up to 3 days. Just bring it to room temperature and re-whip before using.
Common Mistakes to Avoid
Common Mistakes & Fixes
Mistake: The cake layers are dry.
Solution: You probably overbaked them or used not-ripe-enough bananas. Check your oven temperature with an oven thermometer. And use those spotty bananas.
Mistake: The caramel frosting is too runny.
Solution: Your butter or cream might have been too warm. Chill the frosting for 10 minutes and re-whip. Or add a bit more powdered sugar.
Mistake: The cake layers stick to the pan.
Solution: You forgot the parchment paper rounds. Always line the bottoms. Always. I learned this the hard way, just ask my husband about the time I tried to make vegan cheese.
Mistake: The ganache is too thick to drizzle.
Solution: Add a splash more warm cream and stir. It should be pourable but not watery. Think honey consistency.
Mistake: The cake collapses in the middle.
Solution: Your oven door was opened too early or the cake wasn’t baked through. Don’t open the door for the first 20 minutes. And always test with a toothpick.
Recipe Science
Why does this Chocolate Caramel Banana Cake work so well? Let me explain a little bit of the science. Baking soda and bananas are natural partners. The acidity in the bananas reacts with the baking soda to create lift. That’s why the cake rises beautifully without being dense.
Buttermilk adds more acidity, which tenderizes the gluten. It also reacts with the baking soda for even more lift. If you don’t have buttermilk, you can substitute by adding a tablespoon of lemon juice or vinegar to regular milk and letting it sit for 5 minutes. Works like a charm.
The toffee bits melt slightly during baking, creating little pockets of caramelized sweetness. They also add moisture. And the room temperature eggs? They create a better emulsion, which means a lighter, more even crumb. Salt is not the enemy, my friend. It balances the sweetness and enhances the chocolate flavor.
Frequently Asked Questions
Nutrition Information
I’m not going to pretend this is health food. It’s a celebration cake. But here’s the breakdown per slice, based on 12 servings. Each slice has approximately 480 calories, 22 grams of fat, 65 grams of carbohydrates, and 6 grams of protein. The exact numbers depend on your specific ingredients and portion sizes.
If you’re looking to lighten it up, you could reduce the sugar slightly or use a lighter frosting. But honestly? Sometimes you need the real thing. And this Chocolate Caramel Banana Cake is worth every single calorie.
Make-Ahead Strategy
This is where I really shine. I’ve learned that planning ahead makes everything easier. For this Chocolate Caramel Banana Cake, you can bake the cake layers up to 2 days in advance. Wrap them tightly in plastic wrap and store at room temperature. Or freeze them for up to 3 months.
The buttercream can be made up to 3 days ahead and stored in the fridge. Just bring it to room temperature and re-whip before using. The ganache is best made fresh, but you can make it a day ahead and gently reheat it.
For the full assembled cake, you can make it a day ahead. Store it in the refrigerator, then let it sit at room temperature for 30 minutes before serving. The flavors actually meld together beautifully overnight.
Detailed Reheating Guide
If you’re serving leftover slices, here’s how to bring them back to life. For individual slices, let them come to room temperature for about 30 minutes. If you want them slightly warm, microwave for 10-15 seconds. But be careful, too long and the frosting will melt.
For a whole cake that’s been refrigerated, let it sit at room temperature for 45 minutes to an hour. This takes the chill off without compromising the structure. Never microwave a whole cake. Just don’t.
If you’ve frozen unfrosted layers, thaw them in the refrigerator overnight. Then bring to room temperature before frosting. The layers will be just as moist as the day you baked them.
Conclusion
When you bring this Chocolate Caramel Banana Cake to the table, everyone will gasp. I’m not exaggerating. The layers, the caramel drip, the glossy ganache, it looks like something from a bakery window. But you’ll know the secret. You’ll know how simple it really is.
I’ve been making this cake for every celebration since I perfected it. Birthdays, anniversaries, random Tuesdays. It never fails to impress. And honestly, it’s become my go-to. The one I make when I want to feel like a real baker.
So go ahead. Grab your ingredients, preheat that oven, and make this cake. You’ve got this. Now go bake that showstopper. And tag me in your photos, I want to see your masterpiece. For more inspiration, check out my Pinterest boards for more cake ideas and variations.
Source: Nutritional Information
Can I use regular chocolate chips instead of salted caramel baking chips for the frosting?
You can, but you’ll lose that salted caramel flavor. If you use regular chocolate chips, add a pinch of flaky salt to the frosting to compensate. The salted caramel chips really make this Chocolate Caramel Banana Cake special though.
How do I make sure my banana sponge layers stay soft and moist?
Use very ripe bananas, don’t overmix the batter, and don’t overbake. Check the cakes at 22 minutes. If a toothpick comes out clean, they’re done. Let them cool completely before frosting to trap the moisture inside.
What is the best way to store leftover Chocolate Caramel Banana Cake?
Store it in an airtight container in the refrigerator for up to 5 days. Let it sit at room temperature for 30 minutes before serving. You can also freeze individual slices wrapped in plastic wrap for up to 3 months.
Can I substitute buttermilk with regular milk in this banana cake recipe?
You can, but add a tablespoon of lemon juice or white vinegar to the milk and let it sit for 5 minutes. This creates a buttermilk substitute that will still react with the baking soda for proper lift.
How do I achieve the perfect salted caramel sauce consistency for this decadent banana dessert?
For the ganache drizzle, heat the heavy cream until just simmering, then pour over the salted caramel baking chips. Let it sit for 2 minutes, then stir until smooth. It should be pourable but not watery. If too thick, add a splash more warm cream.