


Why This Homemade Mac and Cheese Recipe Works
Let me be honest with you. For years, I was that person who bought the boxed stuff. You know the one. Blue box, powdered cheese packet, the whole deal. And look, I’m not here to judge. Sometimes you just need dinner on the table in ten minutes, and that box delivers. But there was always this little voice in the back of my head wondering what I was missing out on. I mean, homemade mac and cheese from scratch had to be better, right?
Spoiler alert: it is. So much better. And the crazy thing is, it’s not even that much harder. I’m not saying this to be dramatic, but once you make your own creamy cheese sauce with a real roux, you’re not going back to the powdered stuff. I promise you that.
This particular homemade mac and cheese recipe is the one I landed on after… well, let’s just say a few less-than-perfect attempts. There was the time the sauce turned into a greasy mess. And the time I used pre-shredded cheese and ended up with a grainy texture that was, uh, not great. But this version? It’s foolproof. It’s the one I make for family dinners, for potlucks, for those nights when I just need a big bowl of comfort. And it always, always disappears.
Here’s why this recipe works. First, we’re using a classic béchamel base. That’s just a fancy French name for a butter and flour roux with milk. It gives you a velvety smooth sauce that actually clings to the pasta. Second, we’re using a blend of three cheeses: sharp cheddar for that bold flavor, mozzarella for the gooey stretch, and Parmesan for a salty, nutty kick. And third, we’re baking it with a buttery panko breadcrumb topping that adds that perfect crunch. It’s the ultimate comfort food, and it’s easier than you think.

Ingredients for Creamy Baked Mac and Cheese
Before we get into the nitty-gritty, let’s talk about what you’ll need. The beauty of this recipe is that the ingredient list is pretty straightforward. You probably already have most of these in your pantry. And if you don’t, a quick trip to Ralphs or Vons will sort you out in no time.
For the pasta:
- 1 lb elbow macaroni the classic shape. Those little curves are perfect for holding onto the sauce.
- Water for boiling and salt for the pasta water. Don’t skip the salt! It seasons the pasta from the inside out.
For the cheese sauce (the heart of the dish):
- 4 tablespoons unsalted butter
- 1/4 cup all-purpose flour
- 3 cups whole milk and 1 cup heavy cream the combo of milk and cream gives you that rich, decadent texture without being too heavy.
- 1 teaspoon garlic powder, 1 teaspoon dry mustard powder, 1/2 teaspoon paprika, 1/2 teaspoon salt, and 1/2 teaspoon black pepper. The mustard powder is my secret weapon. It doesn’t make the sauce taste like mustard, I swear. It just adds this subtle depth that makes the cheese flavor pop.
- 3 cups sharp cheddar cheese, shredded. This is the star of the show. Go for a good quality block and shred it yourself.
- 1 cup mozzarella cheese, shredded. For that irresistible stretch.
- 1/2 cup grated Parmesan cheese. A little goes a long way, but it adds so much savory flavor.
For the optional topping (and honestly, it’s not optional in my house):
- 1 cup panko breadcrumbs
- 2 tablespoons melted butter
- 1/4 teaspoon smoked paprika
Now, a quick note on the cheese. Please, for the love of all things cheesy, shred your own cheese. I know it’s tempting to grab the pre-shredded bags from the store. I’ve been there. But those bags have anti-caking agents (like cellulose) that prevent the cheese from melting smoothly. You’ll end up with a grainy, clumpy sauce. Just buy a block of sharp cheddar, a block of mozzarella, and a wedge of Parmesan, and shred them yourself. It takes five extra minutes, and the results are night and day. Trust me on this one.
How to Make Homemade Mac and Cheese Step by Step
Okay, let’s get to it. I’m going to walk you through the process in four big stages. Think of these as the major milestones. Don’t worry, I’ll be right here with you.
Stage 1: Prep and Pasta
First things first, preheat your oven to 350°F. Lightly grease a 9×13-inch baking dish with butter or nonstick spray. Set that aside. Now, bring a large pot of salted water to a rolling boil. And I mean salted. It should taste like the sea. Add your elbow macaroni and cook it until it’s just al dente, about 1 minute less than the package directs. This is crucial. The pasta will continue to cook in the oven, so you want it to be slightly underdone. If you cook it all the way now, you’ll end up with mushy mac and cheese. Drain the pasta and set it aside. Do not rinse it! You want that starch to help the sauce cling.
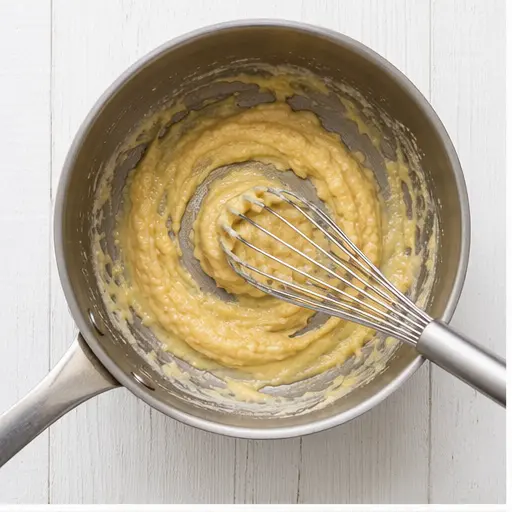
Stage 2: Make the Roux
This is where the magic starts. In a large saucepan over medium heat, melt the butter. Don’t let it brown. You just want it melted and maybe a little bubbly. Then, whisk in the flour. Keep whisking constantly for about 1 to 2 minutes, until the mixture is lightly golden and bubbly. This is your roux. It should smell a little nutty. The key here is to cook the raw flour taste out. If you stop too soon, your sauce will taste like paste. Keep going until it’s that nice pale golden color.

Stage 3: Build the Cheese Sauce
Now, slowly pour in the milk and cream while whisking continuously. I mean it. Don’t dump it all in at once. A slow, steady stream while you whisk will prevent lumps. Keep whisking until the sauce thickens slightly, about 4 to 6 minutes. It should coat the back of a spoon. Then, stir in the garlic powder, mustard powder, paprika, salt, and black pepper. Reduce the heat to low. Now for the best part. Add the shredded cheddar, mozzarella, and Parmesan. Stir until everything is completely melted and the sauce is smooth. Do not let it boil. Boiling the cheese sauce can cause it to separate and become grainy. Low heat, gentle stirring, that’s the way.
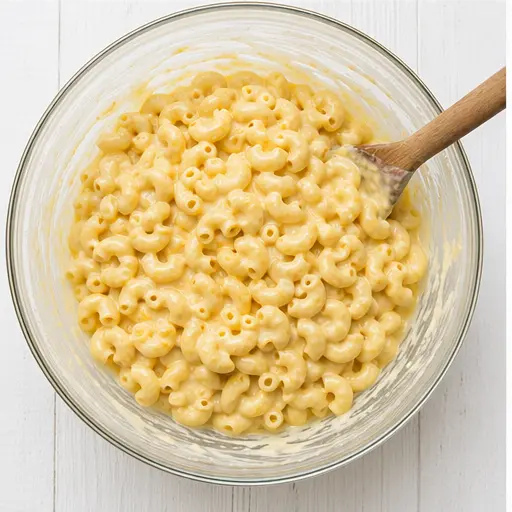
Stage 4: Combine, Assemble, and Bake
Add the cooked macaroni to the cheese sauce and stir well to coat every single piece. Every noodle should be glistening. Pour the cheesy pasta into your prepared baking dish and spread it into an even layer. In a small bowl, mix the panko breadcrumbs with the melted butter and smoked paprika. Sprinkle this mixture evenly over the top. Bake uncovered for 20 to 25 minutes, until the sauce is bubbly and the top is lightly golden. If you want a crunchier topping (and who doesn’t?), switch the oven to broil for the last 2 to 3 minutes. Just watch it closely so it doesn’t burn. Let the mac and cheese rest for 5 to 10 minutes before serving. This is the hardest part, I know, but it lets the texture set so you get those perfect, creamy, not-runny servings.

Tips for the Best Mac and Cheese
I’ve made this recipe more times than I can count, and I’ve picked up a few tricks along the way. Here are the ones that make the biggest difference.
- Shred your own cheese. I said it before, I’ll say it again. Pre-shredded cheese is the enemy of a smooth sauce.
- Cook the pasta al dente (or even a minute less). It will finish cooking in the oven, so you want it to have a little bite left.
- Don’t let the cheese sauce boil. Low and slow is the way to go. Boiling will cause the sauce to break and become grainy.
- Add the milk slowly to the roux. A slow, steady stream while whisking prevents lumps and gives you a silky smooth béchamel.
- Let the mac and cheese rest after baking. Those 5 to 10 minutes are crucial for the perfect texture. It firms up just enough so you can serve beautiful, creamy scoops.
- Add a splash of milk when reheating leftovers. This restores the creaminess and brings it back to life.
Variations to Try
One of the best things about this homemade mac and cheese is how versatile it is. Once you have the base recipe down, you can customize it to your heart’s content. Here are a few of my favorite variations.
Add some veggies. Fold in a cup of steamed broccoli florets, some frozen peas (thawed), or even some sautéed spinach before baking. It adds color and a little nutrition, and my kids don’t even complain.
Switch up the cheese. While I love the cheddar-mozzarella-Parmesan combo, you can experiment. Try using Gruyere for a nuttier, more sophisticated flavor. Or add some pepper jack for a spicy kick. Smoked gouda is also incredible in this.
Make it a main dish. Stir in some shredded rotisserie chicken or some cooked Italian sausage for a heartier meal. It’s a great way to use up leftovers.
Crunchy topping alternatives. If you don’t have panko, you can crush up some Ritz crackers or even potato chips and mix them with melted butter. It gives a totally different, but equally delicious, crunch.
Serving Suggestions
This mac and cheese is a star all on its own, but it also plays well with others. It’s the perfect side dish for a summer BBQ or a cozy weeknight meal.
- Serve it alongside grilled chicken or steak. The creamy, cheesy pasta is a fantastic contrast to smoky, charred meat.
- Pair it with roasted broccoli or asparagus. The green veggies add a nice freshness and a little bitterness that cuts through the richness.
- It’s a potluck hero. Make a big batch, bring it to the party, and watch it disappear. It’s always the first dish to go.
- For a true comfort food feast, serve it with barbecue ribs or pulled chicken. It’s a match made in heaven.

Storage and Reheating
If you have leftovers (which is rare in my house, but it happens), here’s how to store and reheat them properly so they taste just as good the next day.
Storing: Place leftover mac and cheese in an airtight container and store it in the refrigerator for up to 4 days. That’s the max, in my experience. After that, the texture starts to decline.
Reheating: The microwave is the quickest option, but it can sometimes dry out the pasta. To prevent that, add a splash of milk (about a tablespoon per serving) and stir it in before microwaving. Cover the bowl with a damp paper towel and heat in 30-second intervals, stirring in between, until it’s hot and creamy again. For a larger batch, you can reheat it in the oven at 350°F, covered with foil, for about 15-20 minutes. Add a little milk before reheating to restore the creaminess.
Make Ahead Instructions
This recipe is perfect for meal prep or for getting ahead of a busy week. Here’s how to do it.
Assemble the mac and cheese completely, but do not add the breadcrumb topping. Cover the baking dish tightly with foil and refrigerate for up to 2 days. When you’re ready to bake, remove it from the fridge, let it sit on the counter for about 20 minutes to take the chill off, then sprinkle the panko mixture on top. Bake as directed, adding an extra 5 to 10 minutes to the baking time since you’re starting from cold. You can also freeze it at this point, but I honestly prefer to make it fresh. It’s so easy that I don’t find the freezer route necessary.
And there you have it. The ultimate homemade mac and cheese. It’s creamy, it’s cheesy, it’s comforting, and it’s made from scratch with love. I really hope you give it a try. Let me know how it turns out for you. And if you’re looking for more cozy dinner ideas, feel free to check out my Pinterest board for more inspiration.
Happy cooking!
Follow me on Pinterest for more recipes like this one

Ultimate Homemade Mac and Cheese
Ingredients
Method
- Preheat your oven to 350°F. Lightly grease a 9x13-inch baking dish with butter or nonstick spray.
- Bring a large pot of salted water to a rolling boil. Add the elbow macaroni and cook until just al dente, about 1 minute less than the package directs. Drain and set aside.
- In a large saucepan over medium heat, melt the butter. Whisk in the flour and cook, stirring constantly, until the mixture is lightly golden and bubbly, about 1 to 2 minutes.
- Slowly pour in the milk and cream while whisking continuously. Cook until the sauce thickens slightly, 4 to 6 minutes. Stir in the garlic powder, mustard powder, paprika, salt, and black pepper.
- Reduce the heat to low. Add the shredded cheddar, mozzarella, and Parmesan, stirring until completely melted and the sauce is smooth.
- Add the cooked macaroni to the cheese sauce and stir well to coat every piece.
- Pour the cheesy pasta into the prepared baking dish and spread it into an even layer.
- In a small bowl, mix the panko breadcrumbs with melted butter and smoked paprika. Sprinkle this mixture evenly over the top of the pasta.
- Bake uncovered for 20 to 25 minutes, until the sauce is bubbly and the top is lightly golden. For a crunchier topping, switch the oven to broil and cook for 2 to 3 minutes more.
- Let the mac and cheese rest for 5 to 10 minutes before serving to allow the texture to set.
Nutrition
Notes
Tried this recipe?
Let us know how it was!Frequently Asked Questions
Source: Health & Nutrition Research
How do you store mac and cheese?
Store leftover mac and cheese in an airtight container in the refrigerator for up to 4 days. For best results when reheating, add a splash of milk to restore the creamy texture, then microwave in 30-second intervals or reheat in the oven at 350°F until bubbly.
Can homemade mac and cheese be frozen?
Technically yes, but I don’t recommend it for this recipe. The texture of the cheese sauce can change after freezing and thawing, becoming a bit grainy. Since this homemade mac and cheese is so quick and easy to make from scratch, it’s really better to make it fresh when you’re ready to enjoy it.
Can you make this mac and cheese gluten-free?
Absolutely. To make this recipe gluten-free, simply use gluten-free elbow macaroni and substitute the all-purpose flour with a gluten-free all-purpose flour blend or cornstarch. If using cornstarch, use 2 tablespoons instead of the 1/4 cup of flour. The rest of the ingredients are naturally gluten-free.
Can I make this in the crock pot?
I wouldn’t recommend it for this particular recipe. The crock pot can overcook the pasta and cause the cheese sauce to separate. This recipe is designed for the stovetop and oven method, which gives you the best texture and flavor. If you need a slow cooker version, you’d need a different recipe entirely.
The ingredients call for 8 ounces shredded cheddar (2 cups). But I thought 8 ounces equals 1 cup?
This is a common point of confusion! When measuring shredded cheese by volume, 8 ounces by weight equals about 2 cups loosely packed. A solid block of cheese weighs differently than shredded cheese in a measuring cup. So when the recipe says 8 ounces shredded, it means 8 ounces by weight, which gives you roughly 2 cups in volume.