


Why You’ll Love This Vanilla Raspberry Cheesecake Cake
I remember the first time I tried to make a layered cheesecake cake. Honestly, it was a disaster. The cheesecake cracked, the vanilla layers were dry, and the whole thing looked like a leaning tower of dessert. I was so frustrated. But this version? It’s actually foolproof, even for a beginner. I’ve tweaked and tested this vanilla raspberry cheesecake cake until every element works together perfectly. The sponge is tender, the cheesecake is creamy, and the raspberry filling adds that perfect tart pop. With Mother’s Day just around the corner, this is the showstopper you’ve been looking for. It looks like it came from a fancy bakery, but honestly, you can totally pull this off at home.
Vanilla Raspberry Cheesecake Layer Cake
Ingredients
Method
- Preheat oven to 350°F (176°C) and prepare three 8 inch cake pans with parchment paper in the bottom and baking spray on the sides.
- Combine the milk, eggs, vegetable oil and vanilla extract in a large bowl, then separate about 3/4 cup of the mixture into another bowl or measuring cup. About 1 1/4 cups should remain in the other bowl. Set both aside.
- In a large mixer bowl, combine the flour, sugar, baking powder and salt.
- With the mixer on the lowest speed, add the butter about a tablespoon at a time, allowing it to incorporate before adding the next tablespoon. As you add more butter, the mixture will start to clump together a bit a should end up resembling wet sand.
- Add the larger of the reserved egg mixture (about 1 1/4 cups) to the dry ingredients/butter mixture. Stir on the lowest speed until it’s incorporated, then scrape down the sides of the bowl.
- Increase the speed to medium high and beat until light and fluffy, about 45 seconds to a minute. Scrape down the sides of the bowl.
- Turn the speed down to low and slowly add the remaining egg mixture in a slow stream until incorporated.
- Scrape the sides of the bowl, then turn speed back up and mix until well combined, about 10-15 seconds.
- Divide the batter evenly between the three cake pans and bake 20-25 minutes or until a toothpick inserted comes out clean.
- Remove cakes from the oven and allow to cool for 2-3 minutes, then turn out onto a cooling rack to cool completely. The cakes will pull away from the sides of the pan a little as they cool.
- To make the raspberry filling, add the raspberries and water to a food processor and puree until smooth. If you’d like, you can strain the puree to remove the seeds.
- Combine the sugar and cornstarch in a medium saucepan. Stir in the raspberry puree.
- Cook over medium heat, stirring consistently until mixture thickens and comes to a boil, about 8-10 minutes.
- Allow to boil for 1 minute, then remove from heat. Refrigerate and allow to cool completely.
- When ready to build the cake, make the frosting. Add the cream cheese and butter to a large mixer bowl and beat until well combined and smooth.
- Add about half of the powdered sugar and mix until well combined and smooth.
- Add the vanilla extract and salt mix until well combined.
- Add the remaining powdered sugar and mix until well combined and smooth.
- To put the cake together, use a large serrated knife to remove the domes from the top of the cakes so that they’re flat. Refer to my tutorial, if needed.
- Place the first cake on a serving plate or a cardboard cake round.
- Pipe a dam of frosting around the outside of the cake. Refer to my tutorial, if needed. Spread about 1/2 of the filling evenly on top of the cake.
- Place the second cake on top and add another dam of frosting and the remaining raspberry filling.
- Top the cake with the final cake layer and frost with the remaining frosting. Refer to my tutorial, if needed.
- If desired, use a 9 inch offset spatula to create a design in the sides of the cake. Pipe shells around the top edge of the cake. I used Ateco tip 847. Finish off the cake with some fresh raspberries.
- Refrigerate cake until ready to serve. If possible, remove the cake from the fridge 1-2 hours before serving so that it comes closer to room temperature.
- Store in a cake carrier or well wrapped with plastic in the fridge. Best if eaten within 3-4 days.
Nutrition
Notes
Tried this recipe?
Let us know how it was!What Makes This Recipe Special
This isn’t just another cake recipe. I mean, we’re combining three incredible components into one dessert. You’ve got a soft, pillowy vanilla cake, a rich and tangy cheesecake layer, and a vibrant raspberry filling that ties it all together. The balance is amazing. The sweetness of the vanilla and cream cheese frosting gets cut by the bright, tart raspberries. It’s the kind of dessert that makes people close their eyes when they take a bite. I think that’s the highest compliment you can get.
And you know what? It’s easier than it looks. We break it down into manageable steps. You can even make parts of it ahead of time. So don’t let the three layers scare you. We’ll tackle this step by step, and I promise, you’ll feel like a pro by the time you’re done.
Ingredients for the Perfect Layers
Let’s talk about what you’ll need. The beauty of this vanilla raspberry cheesecake cake is that most of the ingredients are pantry staples. You probably have a lot of them already. But there are a few key things to get right.
For the Vanilla Cake Layers
The cake layers are the foundation. You want them soft, tender, and full of vanilla flavor. I use cake flour here. It has a lower protein content than all-purpose flour, which means less gluten development. And less gluten means a more tender crumb. If you don’t have cake flour, you can make your own. For every cup of all-purpose flour, remove two tablespoons and replace them with two tablespoons of cornstarch. Whisk it really well and sift it. It’s not exactly the same, but it works in a pinch.
I also use clear vanilla extract. This is a little trick I learned from a baker friend. It keeps the cake a beautiful, pure white color instead of that slightly brownish tint you get from regular vanilla. It’s a small detail, but it makes the cake look so much more professional.
For the Cheesecake Layer
The cheesecake layer is where things get serious. You need full-fat cream cheese. Don’t even think about using the low-fat stuff. It has too much water and your cheesecake won’t set properly. Let it come to room temperature. This is crucial. Cold cream cheese will give you a lumpy batter, and nobody wants that. I usually take mine out of the fridge about an hour before I start baking.
For the Raspberry Filling
You can use fresh or frozen raspberries here. Both work, but there’s a trick. If you use frozen, don’t thaw them first. Just toss them in frozen. Thawing them releases too much liquid and can make your filling runny. I’ll talk more about this later.
Recipe Science: Why These Ingredients Work
I’m a big believer in understanding the “why” behind a recipe. It makes you a better baker. So let’s break down a few key things.
Why cake flour? As I mentioned, it’s all about the protein content. Cake flour has about 7-8% protein, while all-purpose has 10-12%. Less protein means less gluten, and less gluten means a softer, more delicate cake. It’s the same reason we use buttermilk in some cakes. The acid in buttermilk tenderizes the gluten. But for this recipe, we’re using regular milk and relying on the cake flour for tenderness.
Why room temperature ingredients? This is a big one. When your butter, eggs, and cream cheese are all at room temperature, they emulsify much better. That means they combine into a smooth, homogenous mixture. If your ingredients are cold, the batter can look curdled or separated. It won’t bake up as evenly. So be patient. Let everything come to room temperature. It makes a real difference.
Why coat raspberries in flour? This is a classic trick to prevent fruit from sinking to the bottom of the cake. When you toss the raspberries in a little bit of flour before folding them into the batter, the flour absorbs some of the moisture. This helps the berries stay suspended in the batter as it bakes. Without this step, they’ll sink right to the bottom. It’s a simple step, but it’s the difference between a cake with berries evenly distributed and one where they’re all at the bottom.
Building the Foundation: The Vanilla Cake Layers
Let’s start with the cake. I like to use the reverse creaming method for this. It’s a little different from the traditional way, but it gives you a really tender, fine crumb. You start by mixing the dry ingredients with the butter until it looks like coarse sand. Then you add the wet ingredients. It sounds weird, but trust me, it works. It coats the flour in fat, which limits gluten development even more.
When you add the eggs, add them one at a time. Mix just until they’re combined. Don’t overmix. Overmixing develops gluten, and that’s what makes a cake tough. You want to mix until you don’t see any streaks of flour, and then stop. I know it’s tempting to keep going, but resist the urge.
After you’ve poured the batter into your prepared pans, give them a gentle tap on the counter to release any air bubbles. This helps prevent big holes in your cake. Then into the oven they go.
Now that’s done. See? You’re already halfway there!
Crafting the Creamy Cheesecake Layer
The cheesecake layer is the heart of this vanilla raspberry cheesecake cake. It needs to be creamy, dense, and perfectly set. The key is to not overbeat the batter. Overbeating incorporates too much air, which can cause cracks. You want to mix just until everything is smooth and combined.
Another tip for preventing cracks is to use a water bath. This creates a humid environment in the oven, which helps the cheesecake bake evenly. I wrap the bottom of my springform pan in a double layer of heavy-duty aluminum foil. Then I place it in a larger roasting pan and fill the roasting pan with hot water until it comes about halfway up the sides of the springform pan. It’s a bit of a hassle, but it’s worth it for a crack-free cheesecake.
After the cheesecake is done baking, don’t just yank it out of the oven. Turn the oven off and crack the door open. Let it cool slowly in the oven for about an hour. This gradual cooling helps prevent the dreaded crack. I learned this the hard way after a few cheesecakes that looked like the Grand Canyon.
Making the Raspberry Filling
The raspberry filling is simple, but it packs a punch of flavor. You just cook the raspberries with a little sugar and water until they break down. Then you stir in a cornstarch slurry to thicken it. The result is a beautiful, jewel-toned sauce that’s the perfect balance of sweet and tart.
If you’re using fresh raspberries, you can just toss them in the pan. If you’re using frozen, add them straight from the freezer. Don’t thaw them first. Let the filling cool completely before you use it. A warm filling will melt your cream cheese frosting and make a mess.
Assembling the Vanilla Raspberry Cheesecake Cake
This is where the magic happens. You’ve got all your components ready. The cake layers are cool, the cheesecake is set, and the raspberry filling is thick and glossy. Now it’s time to put it all together.
First, level your cake layers. I use a cake leveler, but a long serrated knife works just fine. You want the tops to be flat so the cake stacks evenly. Place one vanilla cake layer on your cake board or serving plate. Spread a generous amount of cream cheese frosting on top. Then carefully place the cheesecake layer on top of that. Spread a thin layer of raspberry filling over the cheesecake. Then top with the second vanilla cake layer.
Now you’re going to do a crumb coat. This is a thin layer of frosting that traps all the crumbs. It doesn’t have to be pretty. Just cover the whole cake and pop it in the fridge for about 30 minutes to set. This makes the final coat of frosting much easier and cleaner.
After the crumb coat is set, apply the final layer of cream cheese frosting. Use an offset spatula to get it nice and smooth. You can leave it rustic or make it perfectly smooth. It’s up to you. Then garnish with fresh raspberries and maybe a few edible flowers if you’re feeling fancy.
This is the moment it becomes a masterpiece. In just a few more steps, you’ll have a cake worthy of the cover of a magazine.
Tips for the Perfect Vanilla Raspberry Cheesecake Cake
I’ve made this cake more times than I can count. And I’ve learned a few things along the way. Here are my best tips to make sure yours turns out perfectly.
Use Bake Even Strips. These are fabric strips that you soak in water and wrap around your cake pans. They help the cakes bake evenly, giving you flat tops. No more domed cakes that you have to trim. It’s a game-changer.
Press the crust high. For the cheesecake, if you’re using a graham cracker crust, press it up the sides of the pan. This helps prevent cracks by giving the cheesecake something to cling to as it bakes and cools.
Don’t skip the slow cool. I know it’s tempting to rush, but cooling the cheesecake slowly in the oven is the best way to prevent cracks. Be patient. It’s worth it.
High altitude adjustments. If you’re baking above 5,000 feet, you’ll need to make a few changes. Reduce the sugar by 1/4 cup, reduce the baking powder by 1/2 teaspoon, and add 1 tablespoon of milk. This helps the cake rise properly and not dry out.
Use room temperature eggs. I’ve said it before, but it’s worth repeating. Room temperature eggs incorporate into the batter much better. They create a smoother, more stable emulsion. Just take them out of the fridge an hour before you start baking.
Common Mistakes & Fixes
Mistake: The cheesecake layer has big cracks.
Solution: This usually happens from overmixing or cooling too fast. Mix the cheesecake batter just until smooth. And always cool it slowly in the oven with the door cracked.
Mistake: The vanilla cake layers are dry.
Solution: You likely overbaked them or overmixed the batter. Check for doneness a few minutes early. The cake is done when a toothpick inserted in the center comes out with a few moist crumbs. And remember, mix just until combined.
Mistake: The raspberries sank to the bottom of the cake.
Solution: You probably didn’t coat them in flour. Toss the raspberries in a tablespoon of flour before folding them into the batter. This helps them stay suspended.
How to Store Leftover Vanilla Raspberry Cheesecake Cake
Because this cake has a cheesecake layer, it needs to be stored in the refrigerator. Cover it loosely with plastic wrap or place it in a cake carrier. It will stay fresh for up to 5 days. The flavors actually get better after a day or two as they meld together.
You can also freeze this cake. Wrap it tightly in a double layer of plastic wrap, then a layer of aluminum foil. It will keep in the freezer for up to 3 months. To thaw, place it in the refrigerator overnight. Don’t try to thaw it at room temperature, or the frosting might get weepy.
When you’re ready to serve, let the cake sit at room temperature for about 20 minutes. This takes the chill off and makes the cake and cheesecake layers soft and creamy again. Garnish with fresh raspberries right before serving for that pop of color.
Fresh vs. Frozen Raspberries: What’s the Difference?
I get this question a lot. Can you use frozen raspberries? Yes, you absolutely can. But there are a few things to know.
Fresh Raspberries: These are ideal for garnishing and for the filling if they’re in season. They have a brighter, more intense flavor. They’re also less watery, which means your filling will set up a little firmer. But they can be expensive, especially out of season.
Frozen Raspberries: These are a great budget-friendly option. They’re picked at peak ripeness and flash-frozen, so they still have great flavor. For the filling, use them straight from the freezer. Don’t thaw them. Thawing releases a ton of liquid and will make your filling runny. For the cake batter, you can fold them in frozen, but you might want to toss them in a little extra flour to absorb the moisture.
Honestly, for this vanilla raspberry cheesecake cake, both work well. I probably use frozen more often just because they’re convenient and always available at my local Ralphs. Just adjust your technique slightly, and you’ll be fine.
Dietary Adaptations
Want to make this cake work for different diets? Here are a few ideas.
Gluten-Free: You can substitute the cake flour with a good quality gluten-free all-purpose flour blend. Look for one that contains xanthan gum, which helps with structure. The texture will be slightly different, but it will still be delicious.
Dairy-Free: This is a bit trickier because of the cream cheese. But you can use a dairy-free cream cheese alternative. Just make sure it’s a block-style one, not the spreadable kind. It has a higher fat content and will set up better. Use a plant-based butter for the cake and frosting.
I haven’t tested every single variation, so results may vary. But these substitutions are a good starting point if you need them.
Frequently Asked Questions
Conclusion
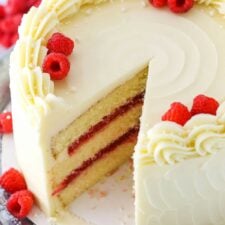
When you slice into this cake, you’ll see those beautiful, distinct layers. The vanilla sponge, the creamy cheesecake, the vibrant raspberry. It’s a work of art. And you made it. I hope you feel incredibly proud. This is the kind of dessert that makes any occasion feel special. Whether it’s Mother’s Day, a birthday, or just a Tuesday, this cake delivers. Tag me when you make it. I’d love to see your layers! You’ve got this. Your loved ones will feel the love in every bite.
For more inspiration, check out my Pinterest boards. I share tons of variations and other dessert ideas there.
Source: Nutritional Information
Can I use store bought raspberry jam for the filling?
You can, but I don’t recommend it for this vanilla raspberry cheesecake cake. Homemade filling has a much fresher, brighter flavor. Store-bought jam is often too sweet and can be thick and gummy. It’s easy to make your own, and the difference is huge.
Can I freeze the Vanilla Raspberry Cheesecake Cake?
Yes, you can freeze this cake for up to 3 months. Wrap it tightly in plastic wrap and then foil. Thaw it in the fridge overnight. The texture will still be great. Just add fresh berries after thawing for the best presentation.
Can I make this on a chocolate crust?
Absolutely. You can substitute the graham cracker crust with a chocolate cookie crust. Use chocolate wafers or Oreo cookies (filling removed). The chocolate and raspberry combination is classic. It will change the flavor profile, but it’s a delicious twist.
