


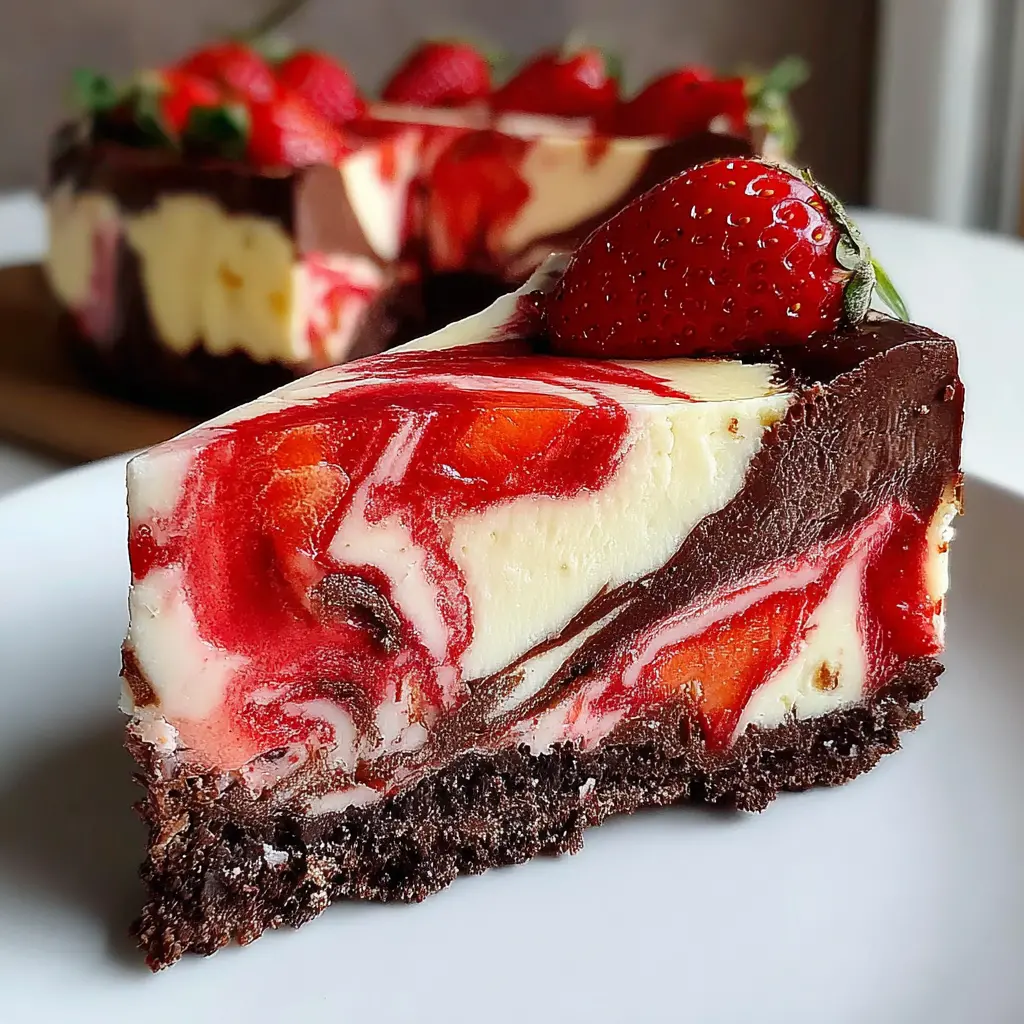

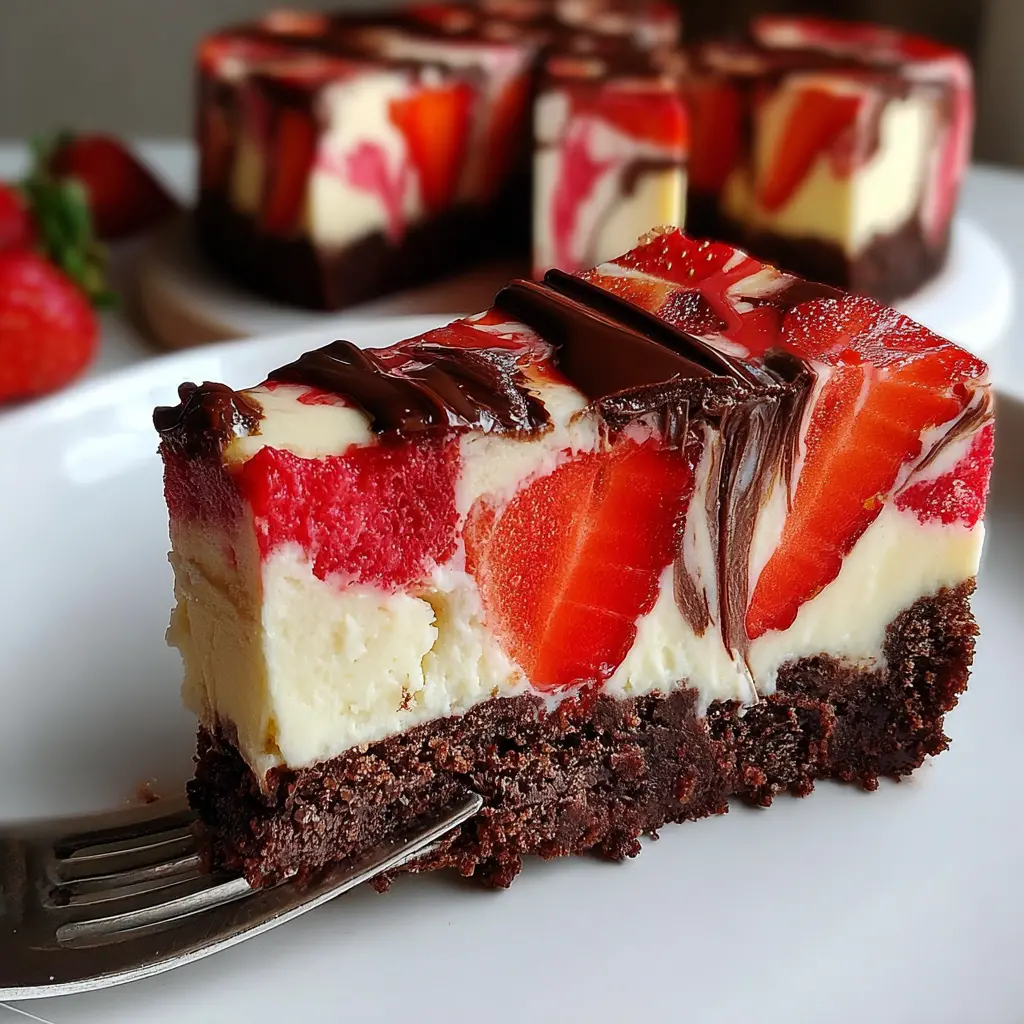
Strawberry Chocolate Cheesecake Cake with Cocoa Crust
Ingredients
Method
- Preheat the oven to 350°F (175°C).
- Prepare the graham cracker crust by mixing graham cracker crumbs with melted butter. Press it firmly into the bottom of a springform pan.
- Beat the cream cheese and sugar together until smooth. Gradually add the eggs one at a time.
- Stir in the vanilla extract and cocoa powder.
- Mix the strawberry puree, remaining sugar, and lemon juice in a separate bowl.
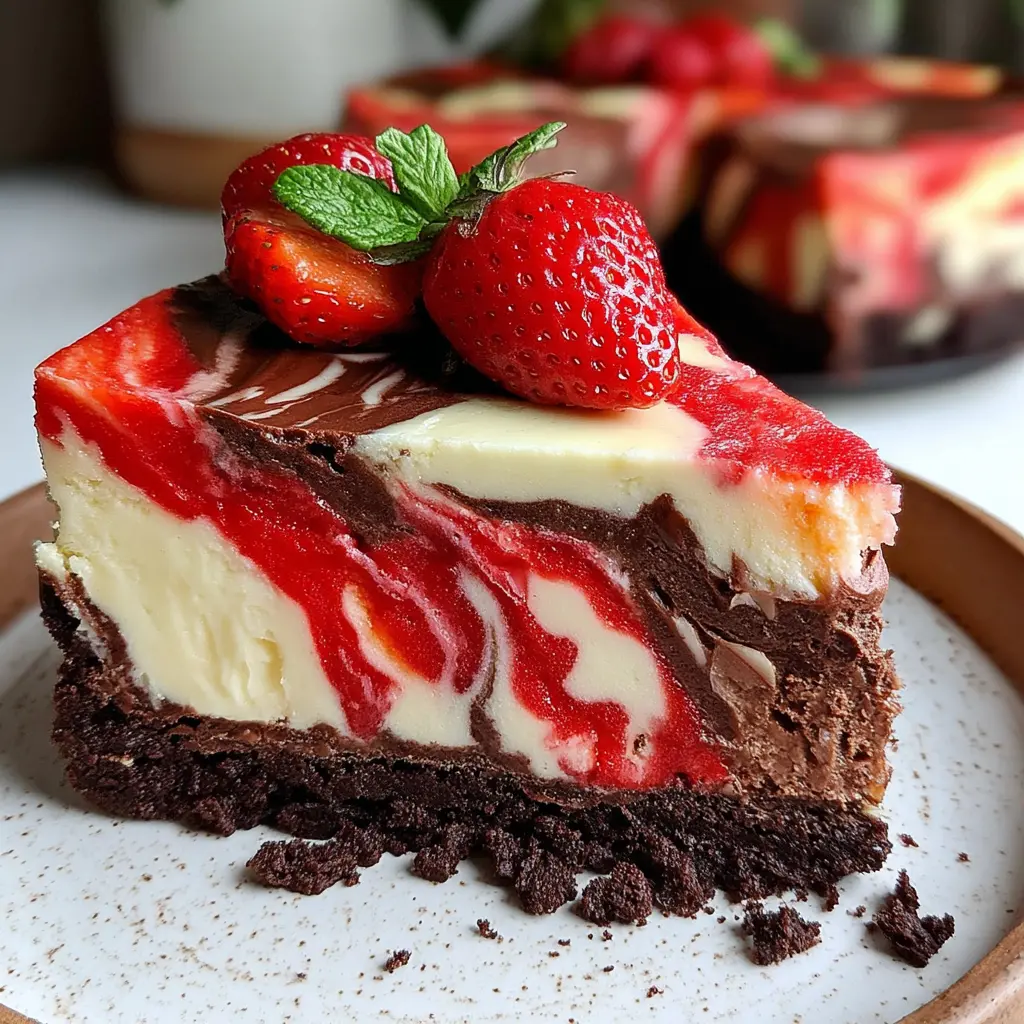
- Pour half of the chocolate mixture into the crust, followed by dollops of the strawberry mixture. Use a toothpick to swirl the mixtures together.
- Bake for 50-60 minutes, until the edges are set and the center jiggles slightly.
- Turn off the oven and leave the cheesecake inside with the door ajar for 1 hour.
- Cool to room temperature, then refrigerate for at least 4 hours or overnight.
- Remove from the springform pan, garnish if desired, slice into pieces, and serve.
Nutrition
Notes
Tried this recipe?
Let us know how it was!Why This Strawberry Chocolate Cheesecake Cake Is Worth Your Weekend
I’ve been there. Staring at a cracked cheesecake layer, wondering if it’s salvageable. Honestly, the first time I attempted this Strawberry Chocolate Cheesecake Cake for Mother’s Day, I nearly cried. The cheesecake had a fissure big enough to lose a strawberry in. But I cracked the code (pun totally intended) and now I’m sharing every secret. This isn’t just another layered cake. It’s three separate components that come together into one show-stopping dessert. And there’s one true technique that makes all the difference.
The thing is, this cake looks like something from a fancy bakery. But once you understand the flow, it’s totally doable. We’re talking rich chocolate cake layers, a creamy, crack-free cheesecake layer, and a bright strawberry filling that tastes like summer. It’s the kind of dessert that makes people gasp when you bring it to the table. And with spring in full swing and fresh strawberries at the Santa Monica Farmers Market hitting their peak, there’s never been a better time to make it.
The Science Behind a Perfect Cheesecake Layer
Let’s talk about the cheesecake. It’s the heart of this Strawberry Chocolate Cheesecake Cake, and it’s where most people get nervous. But here’s the thing: cheesecake is actually pretty simple once you understand the science. And I mean, I learned this the hard way.
The number one rule? Room temperature ingredients. Not cool. Not slightly warmed. Room temperature. Your cream cheese, your eggs, your sour cream (if you’re using it) all need to be at about 70°F. Cold cream cheese creates lumps that no amount of beating will fix. And over-beating incorporates too much air, which causes the cheesecake to puff up in the oven, then collapse and crack as it cools. You want a dense, silky texture, not a souffle.
The water bath is non-negotiable. I know it’s a bit fussy, but it’s the difference between a creamy layer and a dry, cracked one. The steam creates a gentle, even heat that prevents the edges from setting too fast. And here’s the trick I wish someone had told me: use two layers of heavy-duty foil, wrapping from the bottom up the sides of the springform pan. This creates a secure seal against steam. Trust me on this.
Building the Chocolate Cake Layers
The chocolate cake layers need to be sturdy enough to hold up the cheesecake and filling, but still moist and tender. That’s where the cocoa powder comes in. I use natural cocoa powder, not Dutch-processed, because it reacts with the baking soda to give a nice rise and a deep chocolate flavor.
One thing I’ve noticed: if your chocolate cakes dome unevenly, just level them with a serrated knife. Everyone does it. It’s not cheating. And honestly, a flat layer makes assembly so much easier. You want those layers to be perfectly even so the whole Strawberry Chocolate Cheesecake Cake stands tall and straight.
That Strawberry Filling
The strawberry puree is where the magic happens. You cook it down with a little sugar and lemon juice until it thickens and concentrates. This isn’t just for flavor. It’s about moisture control. If you use raw, watery puree, it’ll seep into the cheesecake and create a soggy layer. Nobody wants that.
I love using fresh strawberries from the farmers market this time of year. They’re so sweet and fragrant. But frozen strawberries work too, just thaw and drain them well before pureeing. The color should be a deep, vibrant red, almost like a ruby. That’s how you know it’s right.
Tips for the Best Strawberry Chocolate Cheesecake Cake
Here are the things I’ve learned from making this cake more times than I can count. These tips will save you from most common pitfalls.
First, make the cheesecake layer a day ahead. It actually tastes better after chilling overnight, and it gives you one less thing to worry about on serving day. The texture firms up perfectly, making assembly much easier.
Second, use the bottom of a flat glass or measuring cup to press your graham cracker crust. This gives you a compact, level base that won’t crumble when you slice the cake. And if you want more chocolate flavor, add a pinch of cocoa powder to the graham cracker crumbs. It’s a small tweak that makes a big difference.
Third, when you’re mixing the cheesecake batter, beat just until each egg is incorporated. Over-beating incorporates too much air, which can cause the cheesecake to rise and fall dramatically, leading to cracks. You want a smooth, homogenous batter, not a fluffy one.
Fourth, for the cleanest slices, chill the assembled cake for at least 4 hours, preferably overnight. Then dip your knife in hot water and wipe it clean between each cut. The slices will look like they came from a bakery.
Common Mistakes & Fixes
Common Mistakes & Fixes
Mistake: Using cold cream cheese.
Solution: Let it sit on the counter for at least 30 minutes. Cold cream cheese creates lumps that ruin the smooth texture.
Mistake: Over-beating batter after adding eggs.
Solution: Mix just until combined. Over-beating incorporates air that causes cracks.
Mistake: Skipping the water bath or using leaky foil.
Solution: Use two layers of heavy-duty foil and wrap tightly from the bottom up the sides of the springform pan.
Mistake: Swirling strawberry puree too vigorously.
Solution: Use just 3-4 gentle figure-eight motions with a knife. Over-swirling creates a muddy mess.
Mistake: Cutting the cheesecake before it’s fully chilled.
Solution: Refrigerate for the full 6 hours, preferably overnight. For super-clean slices, use a hot knife.
Mistake: Using raw, watery strawberry puree.
Solution: Always cook and reduce the puree until it thickens. This prevents excess moisture from seeping into the filling.
Delicious Variations to Try
Once you’ve mastered the base Strawberry Chocolate Cheesecake Cake, you can start playing around. Here are some of my favorite variations. And honestly, this is where the recipe becomes your own.
For the crust, you can use chocolate wafer cookies instead of graham crackers. It adds an extra layer of chocolate that pairs beautifully with the strawberry. Or add a pinch of cocoa powder to the graham cracker crumbs for a subtler chocolate boost.
For the chocolate flavor, try using dark chocolate instead of semi-sweet. It gives a deeper, more intense flavor that balances the sweet strawberry filling. Or use milk chocolate for a sweeter profile. Both work great.
If you want to switch up the fruit, raspberries or cherries are excellent substitutes. They give a similar tartness that cuts through the richness of the cheesecake and chocolate. And for a lower-sugar option, use a fresh strawberry topping instead of the cooked puree.
Dietary Adaptations
I know not everyone eats the same way, so I’ve tested a few adaptations for this Strawberry Chocolate Cheesecake Cake. Here’s what works.
For a gluten-free version, replace the graham cracker crumbs with almond flour or oat flour mixed with cocoa powder and melted butter. The texture is a bit more delicate, but it holds together well after chilling.
For a dairy-free version, use plant-based cream cheese and dairy-free dark chocolate. Just make sure the cream cheese is fully softened before mixing. Some brands are a bit softer than regular cream cheese, so adjust accordingly.
For a lower-carb option, use monk fruit or erythritol sweetener instead of sugar. The texture will be slightly different, but the flavor is still amazing. And you can skip the graham cracker crust entirely and just use a nut-based crust.
How to Store Leftover Strawberry Chocolate Cheesecake Cake
This cake stores beautifully, which is great because you’ll probably have leftovers. Unless you’re feeding a crowd, in which case, maybe not.
Store the cake covered in the refrigerator for up to 5 days. The flavors actually meld together and improve over the first couple of days. Just make sure it’s well covered so it doesn’t absorb any fridge odors.
For longer storage, you can freeze individual slices. Wrap each slice tightly in plastic wrap, then in foil, and freeze for up to 2 months. To serve, thaw overnight in the refrigerator. Don’t microwave it. The cheesecake will get weepy and the chocolate cake will dry out.
When you’re ready to serve, let the cake sit at room temperature for 15-20 minutes before slicing. This takes the chill off and makes the flavors more pronounced. Garnish with a fresh strawberry and a dusting of cocoa powder for a beautiful presentation.
Frequently Asked Questions
Final Thoughts
Look, I know this cake looks intimidating. Three separate components, multiple chilling times, a water bath. But once you break it down, it’s really just a few simple steps done well. And the payoff is huge.
When you serve this Strawberry Chocolate Cheesecake Cake at your next spring gathering, watch their faces light up. The layers stand tall, the strawberry filling glistens, and the first forkful melts chocolate, tangy cream cheese, and bright berry together. It’s the kind of dessert that makes people ask for the recipe.
And even if your first attempt isn’t perfect, don’t worry. A dusting of cocoa powder hides a multitude of sins. Guests won’t notice small cracks when they’re eating something this delicious. Trust me on this.
Now go preheat that oven. You’ve got a masterpiece to create. And when you make it, tag me on social media. I love seeing your variations. For more inspiration, check out my Pinterest boards for all sorts of cake ideas.
Source: Health & Nutrition Research
How many servings does this Strawberry Chocolate Cheesecake Cake make?
This recipe makes about 12-16 servings, depending on how generous you cut the slices. It’s a rich cake, so a thin slice goes a long way. Perfect for a birthday party or holiday gathering.
Can I use frozen strawberries for the strawberry puree in this recipe?
Yes, absolutely. Just thaw them completely and drain off any excess liquid before pureeing. Frozen strawberries are often sweeter than fresh, so you might need a little less sugar. They work perfectly in this Strawberry Chocolate Cheesecake Cake.
Why did my cheesecake filling separate from the crust?
This usually happens when the crust isn’t fully cooled before adding the filling, or if the crust wasn’t pressed firmly enough. Let the crust cool completely after baking, and press it down firmly with a flat-bottomed glass to create a solid base.
How do I prevent cracks in my Strawberry Chocolate Cheesecake Cake?
Use a water bath, don’t overmix the batter, and let the cheesecake cool gradually in the oven with the door cracked open. Also, make sure all your ingredients are at room temperature before you start. These steps will give you a smooth, crack-free surface.
How do I know when the cheesecake is done baking?
The edges should be set and slightly puffed, but the center should still jiggle like set Jell-O, not like liquid. A gentle shake of the pan will tell you. It will continue to set as it cools, so don’t overbake it.
Can I make this Strawberry Chocolate Cheesecake Cake ahead of time?
Yes, and I actually recommend it. The cheesecake layer tastes even better after chilling overnight. You can make the whole cake a day ahead and store it in the refrigerator. Just add the fresh strawberry garnish right before serving.
What type of chocolate works best for this recipe?
Semi-sweet chocolate is the standard, but dark chocolate gives a deeper, richer flavor. Milk chocolate works for a sweeter cake. Just avoid chocolate chips, which contain stabilizers that can affect the texture. Use chopped chocolate bars instead.
What is the best way to store leftover Strawberry Chocolate Cheesecake Cake?
Store it covered in the refrigerator for up to 5 days. For longer storage, freeze individual slices wrapped in plastic wrap and foil for up to 2 months. Thaw overnight in the fridge before serving. Never microwave it.