
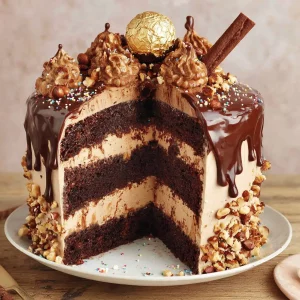

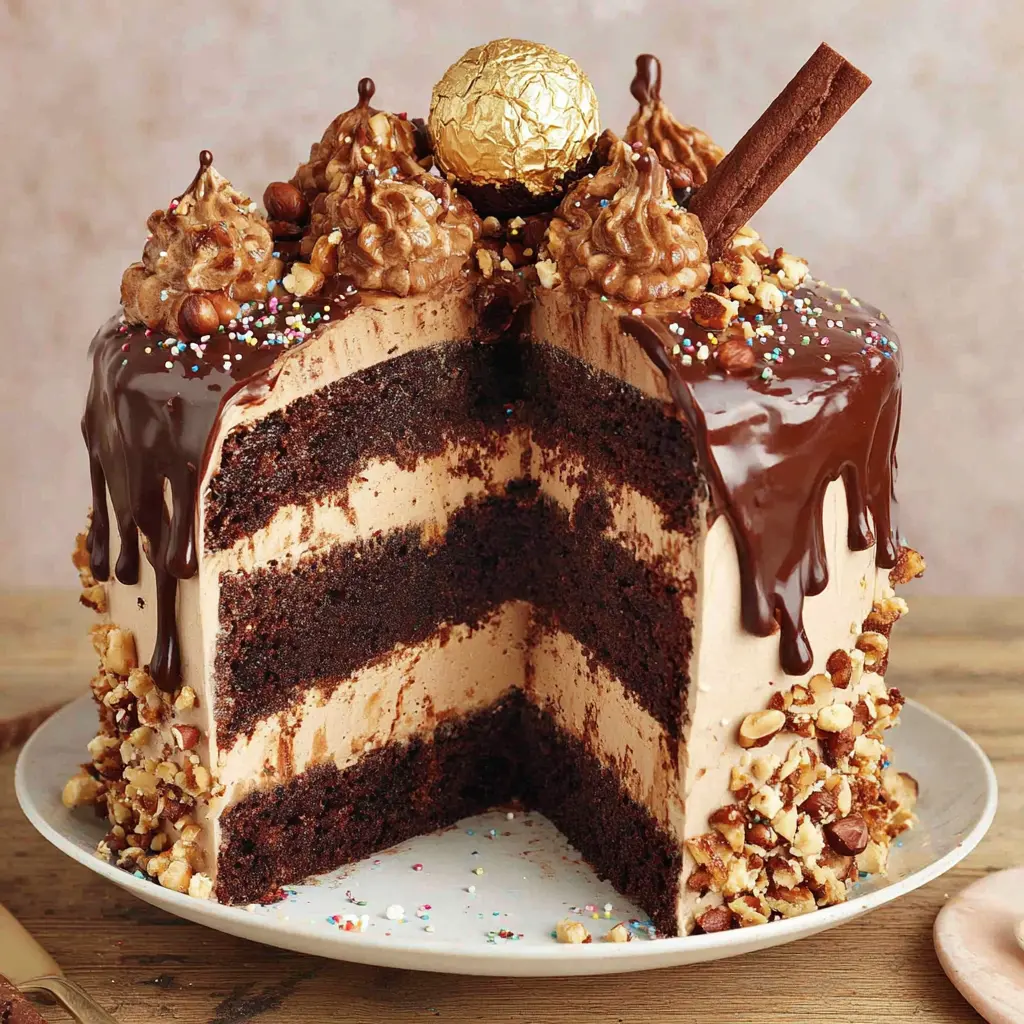
Rich Nutella Hazelnut Drip Cake with Ferrero
Ingredients
Method
- To make caramel, place caster sugar and 1 1/2 cups water in a medium heavy-based saucepan over medium-low heat. Cook, stirring constantly, until sugar is dissolved (do not boil). Increase heat to high. Bring to the boil. Boil, without stirring, for 20 minutes or until mixture is a deep golden colour. Working quickly and carefully, remove pan from heat and add cream. Stir well to combine (mixture will boil and spit). Transfer to a heatproof bowl. Stand for 20 minutes to cool slightly. Refrigerate, uncovered, overnight.
- Place butter, brown sugar, milk and cocoa in a large saucepan over medium heat. Cook, stirring occasionally, for 10 to 15 minutes or until mixture is smooth and combined. Bring to a gentle simmer, stirring occasionally. Remove from heat. Stir in bicarbonate of soda (mixture will foam and rise in pan). Transfer to a large bowl. Cool for 30 minutes.
- Preheat oven to 180C/160C fan-forced. Grease 3 x 20cm round cake pans. Line bases and sides with 2 layers of baking paper.
- Whisk flours and hazelnut meal into chocolate mixture, in 2 batches. Add eggs, 1 at a time, whisking until well combined after each addition. Divide mixture evenly among prepared pans. Bake for 50 to 55 minutes or until a skewer inserted into the centre of cakes comes out clean. Stand cakes in pans for 10 minutes. Turn onto wire racks lined with baking paper to cool completely.
- To make the chocolate bark, line a large baking tray with baking paper. Place chocolate melts in a microwave-safe bowl. Microwave on MEDIUM (50%), stirring with a metal spoon halfway through, for 1 minute or until melted. Spoon onto prepared baking tray and spread until 2mm thick. Decorate with sprinkles. Stand for 20 minutes or until set. Roughly cut into large shards.
- Using an electric mixer, beat butter for 5 to 6 minutes or until pale and fluffy. Add Nutella. Beat to combine. Gradually beat in icing sugar, 1 tablespoon at a time, until sugar is dissolved.
- Place chocolate and cream in a microwave-safe bowl. Microwave on HIGH (100%) for 1 to 2 minutes or until smooth and combined. Set aside for 45 minutes or until cool.
- Meanwhile, trim tops of cakes to level, if needed. Place 1 cake, cut-side down on a serving plate. Spread top of cake with 1/4 of the caramel. Dollop with 1/2 cup buttercream, spreading to cover caramel. Drizzle with 1/3 of the remaining caramel, spreading gently to cover. Top with another cake, cut-side down. Spread top of cake with 1/2 of the remaining caramel. Dollop with ½ cup buttercream, spreading to cover caramel. Drizzle with remaining caramel, spreading gently to cover. Top with remaining cake, cut-side down. Using a palette knife, spread top and side of cake with a little of the remaining buttercream to just coat the cake. Refrigerate for 15 minutes. Cover top and side of cake with remaining buttercream, spreading with a large spatula to create a smooth finish. Refrigerate for 30 minutes or until buttercream is firm to touch.
- Slowly spoon some of the ganache around top edge of cake, allowing it to drip down the sides. Spoon remaining ganache over top of cake, spreading gently to just cover. Stand for 10 minutes. Carefully push chocolate bark and wafer sticks into top of cake. Decorate with Ferrero Rocher and chopped hazelnuts. Serve.
Notes
Tried this recipe?
Let us know how it was!Why You’ll Love This Chocolate Hazelnut Drip Cake
Remember that time you tried to make a drip cake and it looked like a crime scene? I’ve been there. Honestly, my first attempt at a chocolate hazelnut drip cake ended up looking like a melted candle that had been through a war zone. The ganache was either pooling at the bottom like a sad puddle or refusing to drip at all. I mean, it was frustrating. But after testing this recipe about six times (and wasting a lot of good Nutella), I figured out the exact ratios and temperatures that work every single time.
This chocolate hazelnut drip cake is the kind of dessert that makes people stop mid-conversation. It’s tall, it’s glossy, and it’s got that perfect balance of rich chocolate and nutty hazelnut flavor. The cake layers are incredibly moist, the frosting is light and creamy, and that drip? It’s the kind of glossy perfection you see on bakery cakes. You’ll feel like a pro when you pull this off.
And with Mother’s Day coming up in a few weeks? This is the cake to make. I mean, what says “I love you, Mom” better than a show-stopping chocolate hazelnut drip cake with Ferrero Rocher on top? Nothing, that’s what. Let’s get into it.
What Makes This Cake So Good
This isn’t just any chocolate cake. The sponge uses a combination of cocoa powder and hazelnut meal, which gives it this deep, almost toasty flavor. The hazelnut meal adds texture too, so you get these little nutty bits in every bite. And the buttercream? It’s made with Nutella and a touch of hazelnut meal, so it’s not just sweet, it’s actually hazelnut-forward. You know how some chocolate cakes just taste like sugar? This one tastes like something special.
The ganache drip is the real star though. It’s made with dark chocolate and Nutella, which gives it that perfect glossy sheen and a flavor that’s not too sweet. The trick is getting the temperature just right. Too warm and it runs right off the cake. Too cold and it won’t drip at all. I’ll walk you through exactly how to nail it.
Ingredients You’ll Need
Before we get into the nitty-gritty, let’s talk ingredients. You’ll need butter, brown sugar, milk, cocoa powder, baking soda, self-rising flour, all-purpose flour, hazelnut meal, eggs, superfine sugar, heavy cream, milk chocolate melting wafers, sprinkles, Nutella, confectioners’ sugar, dark chocolate, and more heavy cream. Plus some chocolate wafer sticks, Ferrero Rocher chocolates, and hazelnuts for decoration.
One thing I want to stress: use good cocoa powder. Not hot chocolate powder, but real cocoa powder. It makes a huge difference in the depth of flavor. And for the hazelnut meal, you can find it at Trader Joe’s or Whole Foods pretty easily. If you can’t find it, you can substitute with more all-purpose flour. But honestly, the hazelnut meal is what makes this cake special, so try to get it if you can.
Making the Chocolate Hazelnut Cake Layers
The cake batter comes together pretty quickly. You’ll cream the butter and brown sugar until it’s light and fluffy, then add the eggs one at a time. The dry ingredients get sifted together, and you’ll alternate adding them with the milk. The hazelnut meal goes in at the end. I like to fold it in by hand so I don’t overmix.
Here’s a tip I learned the hard way: use room temperature butter and eggs. If your butter is too cold, it won’t cream properly and your cake will be dense. If your eggs are cold, they’ll seize the butter and you’ll get lumps. So take them out of the fridge about an hour before you start baking. Trust me on this.
I bake these layers at 325°F instead of 350°F. It takes a little longer, but the cakes bake more evenly and the tops stay flat. Nobody wants a domed cake that you have to slice the top off. Well, you can slice it off, but why add extra work? Bake lower and slower, that’s my motto.
You’ll know the cakes are done when a toothpick inserted in the center comes out with just a few moist crumbs. Not wet batter, but not completely dry either. The edges should be pulling away from the pan just slightly. Let them cool in the pan for about 10 minutes, then turn them out onto a wire rack to cool completely.
The Hazelnut Meringue Buttercream
This buttercream is a game-changer. It’s not too sweet, it’s incredibly light, and it has that perfect hazelnut flavor. You’ll start by making a Swiss meringue with egg whites and superfine sugar. Heat them over a double boiler until the sugar dissolves, then whip them into stiff peaks. Then you add the butter, a few pieces at a time, and whip until it’s smooth and silky.
I know making meringue buttercream sounds intimidating, but it’s actually pretty forgiving. The key is to not freak out if it looks like curdled soup halfway through. That’s normal. Just keep whipping. It will come together. I promise. Once it’s smooth, you’ll add the Nutella and a bit of hazelnut meal. Whip it again until it’s combined, and you’re done.
If your buttercream looks greasy or runny, it’s probably too warm. Pop it in the fridge for 15 minutes, then whip it again. If it’s too stiff and lumpy, it’s too cold. Let it sit at room temperature for a bit, then whip it. It’s all about temperature control.
The Nutella Ganache Drip
This is where the magic happens. The ganache is made with dark chocolate, Nutella, and heavy cream. You’ll heat the cream until it’s just simmering, then pour it over the chopped chocolate and Nutella. Let it sit for about 30 seconds, then whisk until it’s smooth and glossy.
The consistency is critical here. You want the ganache to be thick enough to coat the back of a spoon, but thin enough to drip. I test it by letting a little bit drip off the spoon. If it flows in a steady stream and then slows down, it’s perfect. If it runs like water, it’s too thin. If it plops like pudding, it’s too thick.
Here’s what I do: I let the ganache cool to about 90°F. That’s the sweet spot. If you don’t have a thermometer, you can test it on the side of a glass. Dip a spoon in the ganache and let it drip down. If it drips in a steady stream and leaves a trail, you’re good. If it pools, it’s too warm. If it stops mid-drip, it’s too cool.
Use a squeeze bottle for the most control. You can find them at any baking supply store or on Amazon. Fill the bottle with the ganache, then pipe it around the edge of the chilled cake. Let it drip down, then fill in the center. It’s so much easier than trying to use a spoon or piping bag.
How to Assemble the Drip Cake
Assembly is where it all comes together. Start by leveling your cake layers if they have domes. Then place one layer on your cake board or plate. Add a layer of buttercream, spread it evenly, then top with another cake layer. Repeat until all four layers are stacked.
Now, here’s the important part: crumb coat. This is a thin layer of buttercream that seals in all the crumbs. Don’t skip this step. It’s the difference between a clean, professional-looking cake and a crumbly mess. Apply a thin layer of buttercream all over the cake, then chill it for at least 30 minutes. This sets the crumb coat and makes the final coat much easier.
After the crumb coat is set, apply the final coat of buttercream. Use a bench scraper or offset spatula to get it as smooth as possible. Don’t worry if it’s not perfect, the drip will cover some imperfections. Then chill the cake again for at least 30 minutes. The cake needs to be cold for the drip to work properly.
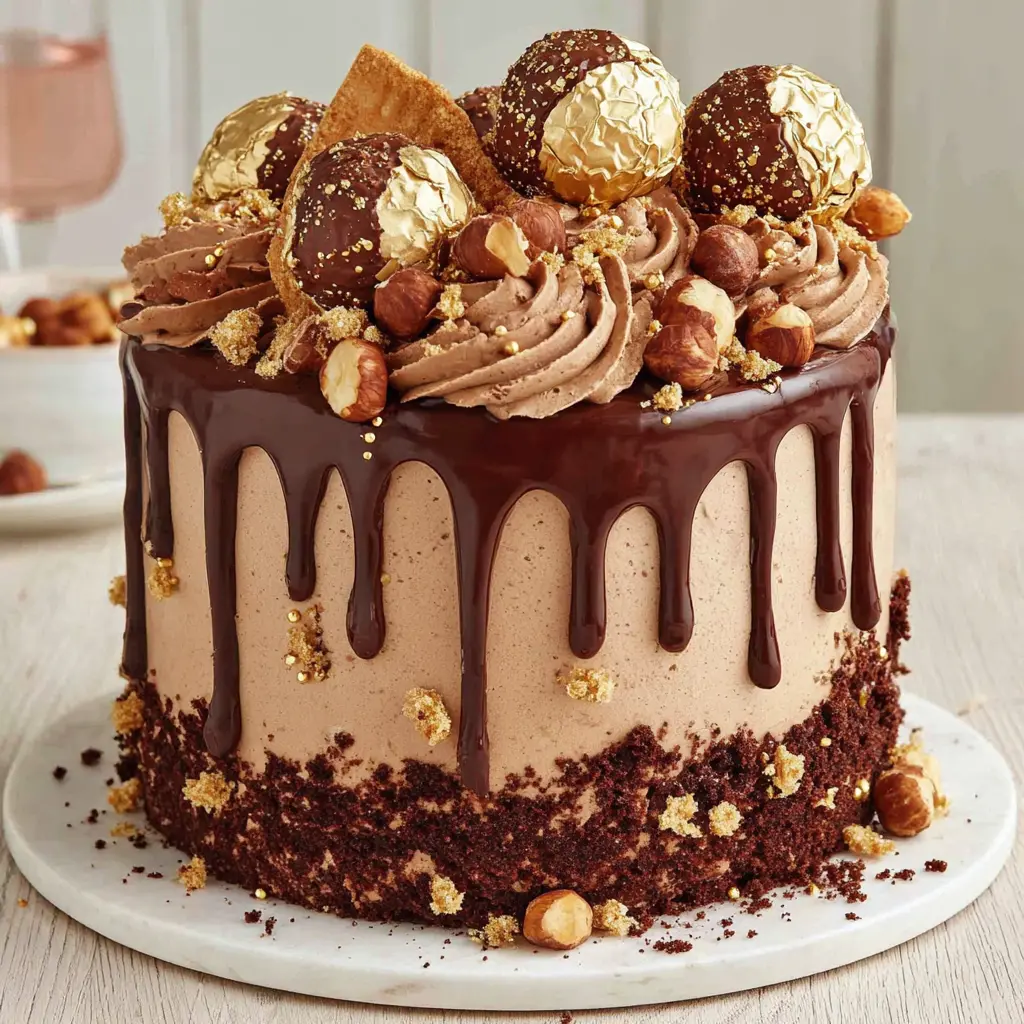
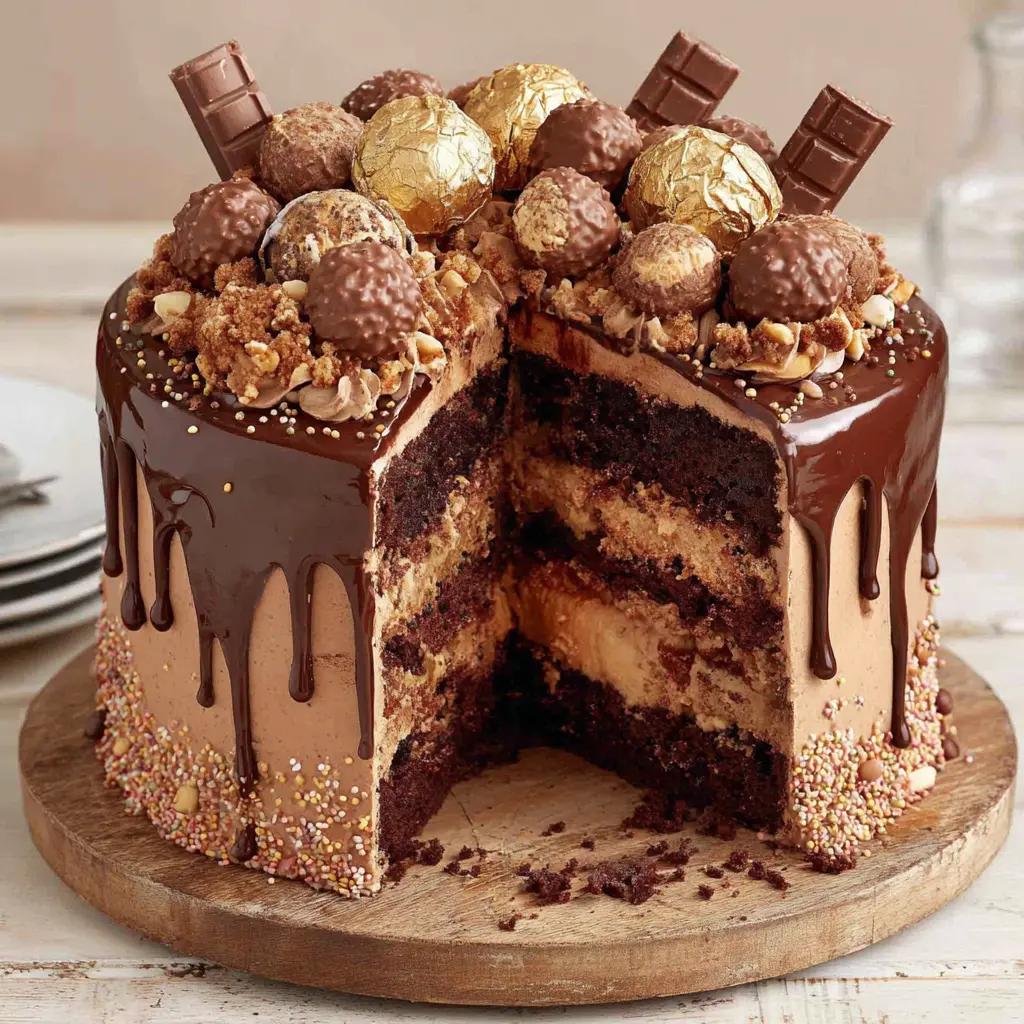
Now for the drip. Take your chilled cake and the squeeze bottle of ganache. Pipe the ganache around the edge of the cake, letting it drip down the sides. Work your way around the entire cake, then fill in the center with more ganache. Use an offset spatula to spread it evenly. Let the drips set for a few minutes before adding the decorations.
Top with Ferrero Rocher chocolates, chocolate wafer sticks, and chopped hazelnuts. You can also add some sprinkles for a pop of color. And if you’re feeling fancy, you can flick some gold leaf on there. It’s optional, but it looks amazing.
Tips for the Perfect Drip
I’ve made a lot of drip cakes, and I’ve learned a few things the hard way. Let me share them with you so you don’t make the same mistakes.
Common Mistakes & Fixes
Mistake: The ganache is too thick and won’t drip.
Solution: Microwave it in 5-second intervals until it’s thin enough to drip. Don’t overheat it or it will seize.
Mistake: The ganache is too thin and runs off the cake.
Solution: Add more chopped chocolate and stir until it thickens. Let it cool a bit before trying again.
Mistake: The drips are uneven or too long.
Solution: Use a squeeze bottle for more control. You can also use an offset spatula to guide the drips.
Mistake: The cake isn’t cold enough and the ganache melts the buttercream.
Solution: Chill the cake for at least 30 minutes after the final coat. The cake needs to be cold for the drip to set properly.
Another thing: don’t overfill the squeeze bottle. You want to be able to control the flow. Fill it about halfway, then test the drip on the side of the cake. If it’s not dripping the way you want, adjust the temperature or consistency before you go all the way around.
Storing Your Cake
This cake keeps surprisingly well. You can store it in an airtight container in the refrigerator for up to 5 days. But honestly, it’s best within the first 2 days. The cake stays moist, and the buttercream stays creamy. The ganache will firm up a bit in the fridge, but it will soften again at room temperature.
If you want to make it ahead, you can bake the cake layers up to 3 months in advance. Double wrap them in plastic wrap and freeze them. When you’re ready to assemble, take them out and let them come to room temperature for about 2-3 hours. The buttercream can also be made ahead and refrigerated for up to a week or frozen for 3 months. Just bring it to room temperature and rewhip it before using.
For serving, take the cake out of the fridge about 30 minutes before you want to serve it. This lets the buttercream soften slightly and the ganache get that perfect glossy sheen again. Slice with a sharp knife, wiping it clean between cuts for the cleanest slices.
Frequently Asked Questions
Final Thoughts
When you serve this chocolate hazelnut drip cake on Mother’s Day, or for any special occasion, you’re going to get all the praise. I mean, it’s a show-stopper. The glossy drip, the nutty layers, the creamy frosting. It’s everything a celebration cake should be.
I know it seems like a lot of steps, but once you break it down, it’s actually pretty straightforward. Bake the layers ahead, make the buttercream, chill everything, then assemble. The drip is the most critical part, but now you know exactly how to nail it. You’ve got this. Your cake will be the star of the table.
Go ahead, make your cake and eat it too. You deserve it.
For more inspiration, check out my Pinterest boards for even more cake ideas.
Can I make this chocolate hazelnut drip cake ahead of time?
Yes! You can bake the cake layers up to 3 months ahead and freeze them. The buttercream can be made a week ahead and refrigerated. Assemble the cake the day before, then add the drip and decorations on the day you’re serving it.
How do I store leftover chocolate hazelnut drip cake?
Store it in an airtight container in the refrigerator for up to 5 days. Let it sit at room temperature for 30 minutes before serving for the best texture and flavor.
Can this ganache be used to cover a chocolate Swiss roll?
Absolutely! The ganache works great on any cake or pastry. Just make sure the Swiss roll is chilled before you pour the ganache over it so it sets properly.
What is heavy whipping cream?
Heavy whipping cream is a high-fat cream (usually 36-40% milk fat) that whips up into stiff peaks. You’ll find it in the dairy section at any grocery store like Ralphs or Vons. Don’t use half-and-half or light cream, they won’t work.
Can you freeze Nutella ganache?
Yes, you can freeze it for up to 3 months. Thaw it in the refrigerator overnight, then reheat it gently in the microwave in 15-second intervals until it’s the right consistency for dripping.
Can you cool this ganache and pipe rosettes?
If you chill the ganache to a peanut butter consistency and whip it with an electric mixer, it becomes a spreadable frosting that you can pipe. It won’t hold as firm as buttercream, but it works for simple designs.
Does it set or is it more of a sticky drip?
It sets! Once dripped on a cold cake, the ganache firms up into a glossy shell. It’s not rock hard, but it’s firm enough to hold its shape and not be sticky to the touch.
Can I use this to frost and coat my cake?
You can, but you’ll need to chill it to a peanut butter consistency first, then whip it with an electric whisk. It becomes a spreadable frosting that works well for a smooth finish.